• Home
  • Recipes
    • Vegan
    • Raw
    • Salad
    • Soup
    • Treats
    • Smoothies & Juices
      • My Awesome Smoothie Book
      • Favourite Products
      • Smoothie & Juice Recipes
      • Juicing Articles
  • Happiness
  • Adventures
  • Work with Me
smarterfitter

Search Results for: no knead

Uncategorized

No Knead Bread with Seeded Crust

August 18, 2015 · By Monica Shaw

No Knead Bread with Seeded Crust

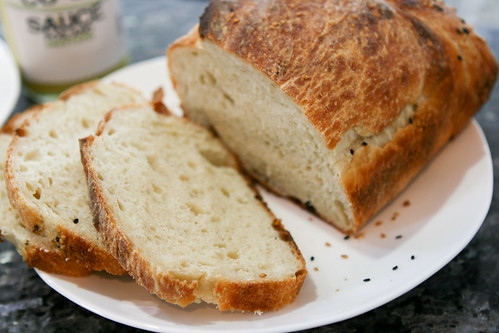
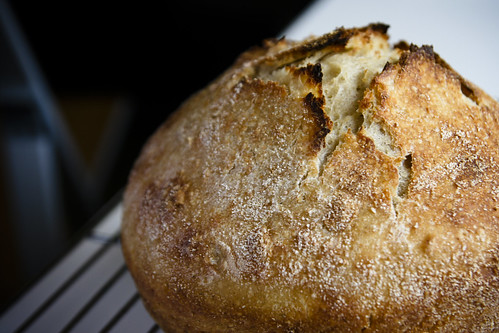
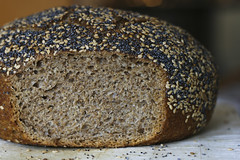
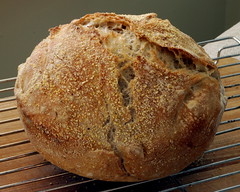
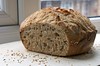
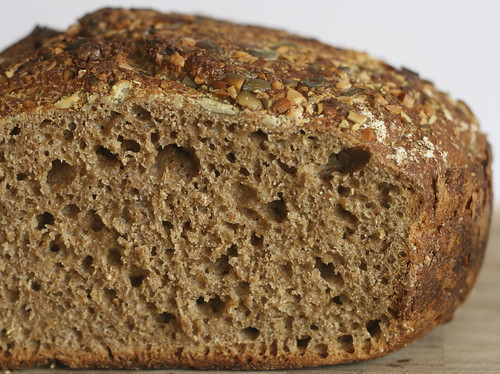
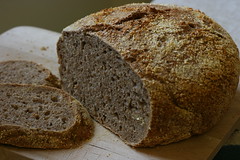
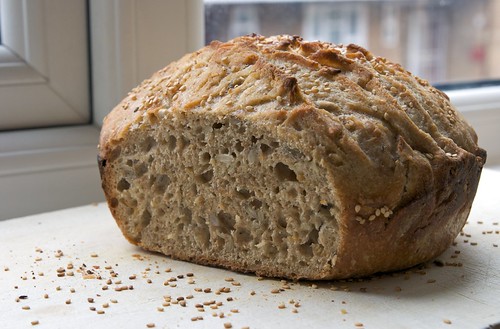
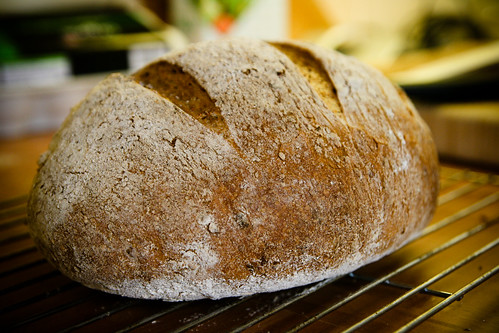
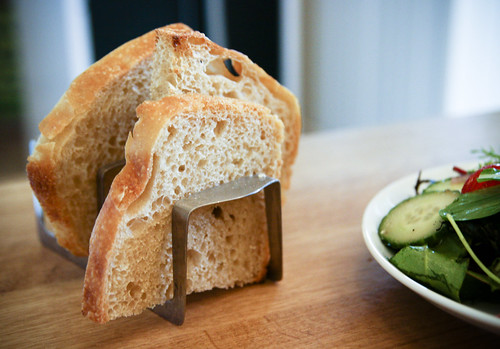
This is by far the most popular bread recipe that I make, with a crispy beautiful crust on the outside and a soft moist crumb on the inside. It is also one of the easiest breads you can make. As the title suggests, no kneading is required. Just a little time, a few ingredients and a cast iron pot. Start this bread the night before you want to eat it.

No Knead Bread with Seeded Crust

Ingredients

    • 470 grams strong white bread flour*
    • 1/4 teaspoon yeast
    • 10g fine sea salt
    • 350 ml water (warm or cold, just not boiling hot)
    • A bit of oil for coating a bowl
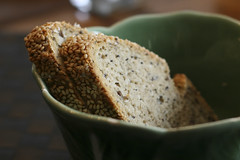
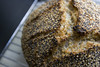
    • mixed seeds (I use poppy and sesame)

Tools needed:

  • mixing bowl
  • paper towels
  • spoon (or your hands)
  • cast iron pot with a lid
  • oven

Method

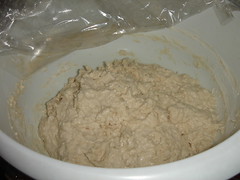
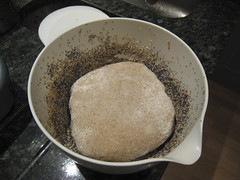
  1. Mix together the flour, yeast, salt and water in a mixing bowl using your hands or a spoon (it should look like a shaggy dough ball). Cover with cling film (or a plate) and let it rest for 12-24 hours. After 12-24 hours, the dough will have risen and filled the bowl.
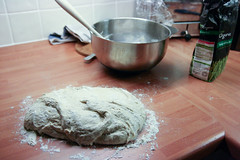
  2. Flour a work surface and “pour” the dough out of the bowl onto the floured surface – I use a spatula to scrape the dough off the sides of the bowl.
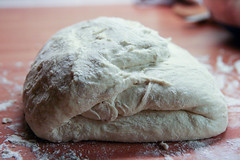
  3. Gently stretch out the dough into a flat squarish shape. Fold the dough into thirds as you would a letter, then fold it again into thirds in the other direction. This should give you a little folded up parcel with a seam – rest the dough with the SEAM SIDE DOWN on the work surface for about 15 minutes.
  4. While the dough rests, clean and dry your bowl.
  5. Oil the inside of the boil and spread it around with a paper towel. Put your seeds in the bowl and tip the bowl around so that the seeds cover the inside of the bowl.
  6. Place the dough into the bowl with the SEAM SIDE DOWN.
  7. Let the dough rest for about an hour or so.
  8. About half an hour before you’re going to make the loaf, put your cast iron pot and lid into the oven and turn the oven up as high as it goes (mine maxes out at 220 C). Let the oven heat up for about 30 minutes so that it’s good and hot (and the pot too).
  9. When the oven is ready, remove the cast iron pot from the oven. Remove the lid.
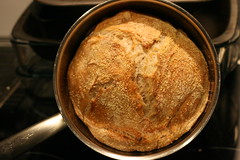
  10. Take your bowl with the dough in it and rotate it around to loosen the dough from the seeds. Now be brave and quickly flip the dough out of the pot into the hot cast iron pan (ideally it will land with all of the seeds facing upwards but don’t despair if it catches on the side of the pot and looks a mess – this bread is very forgiving).
  11. Put the lid back on the pot (be careful, it’s hot!) then put the pot into the oven.
  12. Bake for 20 minutes. Then remove the lid, turn the oven down to 200 C, and bake for another 10-15 minutes, until the top is nicely golden brown.
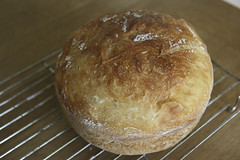
  13. Remove from the oven, remove the bread from the pot, and let it cool (ideally for at least 40 minutes) before slicing. (Or rip into it straight away – it’s all good!)

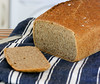
* You can also use wholemeal flour here, or a mixture of white and wholemeal, but the rise might not be dramatic.

Related posts:

  • No Knead Bread with Variations
  • The Easiest No Knead Bread Recipe (no dough flipping required)
  • Wholemeal No Knead Bread
  • Four-Seed No Knead Bread

Bread

The Easiest No Knead Bread Recipe Ever

January 17, 2014 · By Monica Shaw

I’ve been a little quiet these last four weeks, due to recent holiday travels to the States which typically saw a serious decline in all productivity (the evidence is in the nearly 1000 photos I took while there). On the plus side, it saw a huge upswing in QFT (Quality Family Time) and gave me the chance to binge on baking as I knew I’d have plenty of willing recipients to devour my creations!

One of my staple bakes is the infamous no knead bread. I have been making this loaf for years and it is the bread I bake most (see Easiest No Knead Bread with Variations). There are two reasons for this: (1) it’s the easiest bread recipe in the world and (2) it is the bread that always gets the most positive reviews (which makes me wonder why I slave over sourdough, but that’s a topic for another time and place).

The no knead bread recipe is based on this recipe from the New York Times. And it really is a loaf that ANYONE can make – mix the dough, let it rest for ages, shape it, then bake it. The only tricky part is that it requires a dutch oven or cast iron pot, and involves transferring the risen dough into the hot pot after it’s pre-heated in the oven. This step is easy to overcome, but still, as much as I’ve tried to convince the people who love this loaf that YES THEY CAN bake it themselves, few give it a go. I guess buying a loaf is still just that much easier – and far less scary. Until now!

No knead bread just got way easier. Lazy approach wins. Baked this one 36 hours after mixing the dough in a bread tin (no proving).

While I was in Chicago, having fun and neglecting this blog, I was also often neglecting my dough! I’d mix the dough with the best intentions but then something would come up and take me out of the kitchen for hours or days. The original no knead bread recipe says to let the dough rise 12-18 hours, but there were times when I’d let the dough rise for 36-48 hours. Gasp!

There were other times when I didn’t have a lidded pot to cook it in. Surely I was cruisin’ for disaster.

And yet, every loaf turned out just fine. In fact, better than fine. The bread – and in turn, the toast – became legendary!

Dad, Monica, Bread

This was the trip where I learned just how forgiving the no knead recipe is. Not only can you let the dough sit for days, but you can also bake the loaf in a normal bread pan without a lid and still get stellar results (see the recipe below).

I did this a LOT while my relatives from Ohio were in town. Toast was high on the breakfast agenda, and my family quickly soon started referring to me as the “toast fairy” because their kids would wake up and there the bread would be, magically waiting for them with butter and jam (what can I say, I’ve had a lot of practise with Airbnb). This was almost as magical as the view outside (prime toast-eating weather):

Snow Globe -esque

Throughout their stay, the “toast fairy” theme took on a life of its own – we schemed ideas for cafes and childrens books and animated movies. After all, who in the world isn’t comforted by a slice of toast? Consequentially, this is not a new discovery – San Francisco is already hip to the artisan toast trend (as written in this highly moving article in the Pacific Standard about where it began); it’s only a matter of time before the toast trend hits London. Which makes me wonder, being the “toast fairy”, if I’ve stumbled upon my true calling?

Toast Fairy Apron from Melissa and Jim

(I big pile of thanks to Jim and Melissa for the apron! If only toast travelled well, I’d send you a thank you slice from here to Ohio!)

Now here is that recipe I promised. People who fear baking bread, I implore you to try this! You can and will succeed!

The Easiest No Knead Bread Recipe Ever
Recipe Type: Bread
This is a simplified version of Jim Lahey’s [url href=”http://www.nytimes.com/2006/11/08/dining/08mini.html?_r=2&”]no knead bread recipe[/url]. This recipe is for people who don’t have a lidded pot to bake in, or who are intimidated by some of the steps in Lahey’s method. When you’re ready to take things to the next level, check out my previous post on [url href=”https://smarterfitter.com/2011/01/17/easiest-no-knead-bread-with-variations/”]no knead bread with variations[/url] – the seeded crust variation is my favourite.
Ingredients
  • 3 cups (470g) all-purpose or bread flour
  • 1/4 teaspoon instant yeast
  • 1.25 teaspoons (10g) salt
  • a little milk
  • sesame and poppy seeds (optional)
Instructions
  1. In a large bowl combine flour, yeast and salt. Add 1 5/8 cups (350g) water, and stir until blended; dough will be shaggy and sticky. Cover the bowl with plastic wrap. Let dough rest at least 12 hours, preferably about 18, at warm room temperature. I’ve left the dough for as much as 36-48 hours and it works just fine!
  2. The dough is ready when its surface is dotted with bubbles. Lightly flour a work surface (or a big plate or cutting board). Wet your hand and use it to pull the dough out of the bough and onto the work surface. Fold the dough into thirds (as if you were folding a letter), then rotate the dough and fold it into thirds again.
  3. Lightly grease a bread pan. Place the dough into the pan with the folded seam up. Brush a little milk or water onto the loaf and sprinkle with sesame and poppy seeds. Let the dough rest 60-120 minutes (you don’t HAVE to do this but it can help – definitely don’t let it rest more than 2 hours).
  4. Preheat the oven to 500 F / 260 C (or as hot as the oven will go). Put the bread in the oven. After 20 minutes, turn the oven down to 400 F / 200 C. Check the loaf and make sure it’s not getting too dark – if it is, cover it with some foil. Bake for another 15 minutes.
  5. Cool the loaf on a wire rack.
3.2.1753


Recipe

Easiest No Knead Bread with Variations

January 17, 2011 · By Monica Shaw

Volcanic No Knead Bread

My mother is putting together a family cookbook, a compendium of family favourites from across the generations. Many recipes, from matzo ball soup to Grandma’s favourite cheese ball, have made the cut, and I’m proud to list my no knead bread among them.

Of course, this isn’t really my recipe – it was originally made popular by Mark Bittman’s 2006 New York Times article about baker Jim Lahey. I’ve been making versions of this loaf ever since with various combinations of flours and seeds. I love it so much I can’t seem to do without it, so on visits home, my family has become accustomed to me taking over their kitchen and their house with dough balls, flour and yummy bread smells.

No knead bread may not be as long-standing a family tradition as pumpkin pie or lazy pierogi, but I’m hoping it goes the distance for generations to come.

No Knead Bread Perfect No Knead Bread Four-Seed No Knead Loaf Cross Section: 100% Whole Wheat No Knead Bread

“What makes Mr. Lahey’s process revolutionary is the resulting combination of great crumb, lightness, incredible flavor — long fermentation gives you that — and an enviable, crackling crust, the feature of bread that most frequently separates the amateurs from the pros…The loaf is incredible, a fine-bakery quality, European-style boule that is produced more easily than by any other technique I’ve used, and will blow your mind.” – Mark Bittman, New York Times

Here is the recipe as I make it, along with a few variations I like.

Easiest No Knead Bread with Variations

I don’t buy store-bought bread anymore because this is so easy and so much better. And you can easily adapt it to your liking by mixing up the flours, adding seeds, whatever. The recipe is based on Jim Lahey’s No Knead Bread technique, made popular by a 2006 Mark Bittman article in the New York Times. The article is well worth a read, as is watching his video demonstration of the technique.

Ingredients

  • 470g bread flour (white, whole wheat or a mix)
  • 10g salt
  • 1/4 tsp yeast
  • 350ml water
  • 2 Tbsp olive oil (optional, but I’ve found that a bit of oil in the dough helps it toast better)

Method

  1. Mix all the ingredients in a bowl to achieve a wet, shaggy dough ball. If you’re using whole wheat flour, you will need to add more water – don’t be shy, wetter is better. The dough should be wet enough that it “oozes” a little bit in the bowl.
    no knead bread dough
  2. Cover the bowl with plastic wrap and let it rest for 12-24 hours.
  3. Sprinkle some flour on a clean countertop. Turn the dough onto the countertop – I use a spatula to scrape / pour the dough out of the bowl. It will be very sticky, so coat your hands with some flour before handling the dough.
    No knead bread in progress
  4. Pull the dough at either end to form a strip. Fold this strip into thirds, like a business letter. Give the dough a quarter turn and fold it in thirds again.
    No knead bread in progress
  5. Oil an oven-safe pot with a lid (I use an $8.99 Ikea medium/1lb saucepan, but ideal is a cast iron pot or dutch oven). Put the dough inside of the pot with the fold-seam UP. Put the lid on the pet and let it rest for 1-2 hours.
  6. Put the lid inside of a cold oven and turn it up to max. After 30 minutes, turn down the oven to 200C / 390F and bake for another 25 minutes. Remove the lid and bake another 5 minutes, or until the crust is nicely browned.
    Small pot no knead bread
  7. Remove the dough from the pot and let it cool on a wire rack completely before slicing.
    Check out that rise!

Variations

Mixed Grain No Knead Bread

If you don’t have an oven safe pot with a lid.

Use a regular bread pan. The lid helps keep the moisture in and improves the bread’s crust. To achieve the same thing with a regular bread tin, do the following: about 5 minutes before you put the loaf in, put a metal baking tray into the bottom of the oven and boil the kettle. Right after you put the bread in the oven, tip the boiling hot water from the kettle into the pan and close the oven door. Alternatively, use a spray bottle to spray the top of the loaf with water once at the beginning, and once in the middle of baking.

100% whole wheat no knead bread. Whole Wheat No Knead Bread with Almonds and Pumpkin Seeds

Use all whole wheat bread flour. Use more water, starting at 350ml and adding more as you mix until you get a fairly wet shaggy dough ball. Make sure you oil whatever you bake it in really well as this has a tendency to stick.  Bake an extra 10 minutes.

The original no knead bread. Volcanic No Knead Bread

The original recipe requires a bit of coordination, but produces an even better loaf of bread (according to some). After step 4, place the dough ball into a well-oiled bowl with the seam side DOWN. Cover the bowl with plastic wrap and let it rest for 1-2 hours. At least half hour before you bake the bread, put the covered pot into the oven and heat the oven to 450 degrees. Remove the (hot!) pot from the oven, take off the (hot!) lid, and a bit of oil or butter and swish it around so that the inside of the pot is covered. Now, take the bowl with the dough and flip it over the pot so that the dough lands in the pot with the seam side UP. Put the (hot!) lid back on the pot and return to the oven. Baked for 45 minutes, then remove the lid and back another 5 minutes or until the loaf is nicely browned. Finally, let cool on a wire rack.

Seeded no knead bread. Seeded Whole Wheat No Knead Bread

“Best loaf yet,” according to Dad. For the ingredients, mix 30g rye flour, 300g white bread flour, 140g King Aurthur white whole wheat flour, 1 1/2 tsp salt, 4 tsp quinoa, 1 Tbsp poppy seeds, 1 Tbsp flaxseed, 1/4 tsp yeast, 350 ml water, 2 Tbsp yogurt. Proceed with the recipe.

Seeded crust. Four-Seed No Knead Loaf

I love this. Follow the original no knead bread recipe, but after you oil the bowl, add a sprinkle of seeds and shake them around the bowl so that they cover the inside. Then add the dough ball and proceed. When you flip the dough out of the bowl, it will be nicely covered in lovely seeds! I usually do a mix of sesame and poppy seeds, sometimes adding sunflower seeds if I’m in the mood.


Related links and posts:

  • Seeded whole wheat no knead bread
  • 100% whole wheat no knead bread
  • Four seed no knead bread
  • The Secret of Great Bread: Let Time Do the Work [New York Times]

Recipe

100% Whole Wheat No Knead Bread

May 10, 2009 · By Monica Shaw

Whole Wheat No Knead Bread with Almonds and Pumpkin Seeds

If you’ve ever wanted to bake bread but were always too chicken to try, then please visit Jim Lahey’s article and give No Knead Bread a whirl. I’ve been baking bread this way for months and I swear it’s the best thing ever. Why? Because fresh homemade bread is like sliceable heaven. There is a certain beauty in its simplicity: water, salt, yeast and flour. That’s all it takes! This is whole, natural food, folks. No preservatives needed. All that hippy stuff aside, what really gets me baking are the flavor and the time. Jim Lahey’s recipe turns out a seriously delicious loaf of bread, and because there’s no kneading involved, it’s super quick to throw together (aside from the 18-hour rise time!).

Jim’s No Knead bread is perfect for whole wheat loaves because it turns out a light, moist loaf. That’s right, this is a whole wheat bread recipe that doesn’t turn out a dense, brick-like loaf more suitable as a doorstopper than something you’d actually eat.

Here is my version made with 100% whole wheat flour. I use Doves Farm Strong Wholemeal Bread Flour because I like the flavor, but feel free to experiment with different brands and different blends. There’s no reason you can do half whole wheat, half white, or get crazy with spelt, rye and malted grains.

100% Whole Wheat No Knead Bread

Whole Wheat No Knead Bread

470g whole wheat four
1/4 tsp. yeast
12g salt
350ml water

  1. Combine all dry ingredients then add the water. Stir until the dough has the consistency of a shaggy ball, adding more water if necessary (chances are, you’ll have to add quite a bit more water so don’t be shy – it’s better to have a dough ball that’s too wet than too dry). Cover the bowl with plastic wrap. Let the dough rest in a warm place for 12 – 24 hours (the longer you leave it, the lighter, more flavorful the result will be). The dough is ready when it’s about double in size and spotted with big bubbles.
  2. Give the counter top and your hands a generous sprinkle of flour. Turn the dough onto the counter. Pull the dough at either end to form a strip. Fold this strip into thirds (like a business letter). Give the dough a quarter turn and fold in thirds again. I’ll refer to these folds as “seams”, i.e., “right now your dough is on the counter, seam side up.” Cover with plastic wrap and let rest about 15 minutes.

    No Knead Bread in Progress

  3. Oil a large bowl with olive oil. If you like, sprinkle the bowl with seeds (this is not only tasty, but it also makes it easier to turn the dough out of the bowl when you’re ready to bake it). Put the dough ball into the bowl seam side down. Cover with the plastic wrap and let sit for 2-3 hours. The dough is ready when it has more than doubled in size.

    No Knead Bread in Seeded Bowl

  4. Preheat the oven to 450 degrees. Put a 6- to 8-quart heavy covered pot (cast iron, enamel, Pyrex or ceramic) in the oven as it heats. When the dough is ready, remove the HOT pot and pour in a bit of olive oil. Swirl it around so that oil covers the entire inside of the pot. Now, take the bowl containing the dough and quickly turn it upside down over the pot so that the dough falls in seam side up. Cover the pot with a lid and bake for 40 minutes. Then remove the lid and bake another 5 or so minutes, until the loaf is browned. Cool on a rack at least 45 minutes before slicing.

    Small pot no knead bread

No Knead Recipe Variations
No knead Bread – Jim Lahey’s original recipe

Bread

Four-Seed No Knead Bread

June 29, 2008 · By Monica Shaw

skitched-20080629-204146.jpg

If you’ve ever wanted to bake bread but were always too chicken to try, then please visit Jim Lahey’s article and give No Knead Bread a whirl. I’ve been baking bread this way for months and I swear it’s the best thing ever. Why? Because fresh homemade bread is like sliceable heaven. There is a certain beauty in its simplicity: water, salt, yeast and flour. That’s all it takes! This is whole, natural food, folks. No preservatives needed. All that hippy stuff aside, what really gets me baking are the flavor and the time. Jim Lahey’s recipe turns out a seriously delicious loaf of bread, and because there’s no kneading involved, it’s super quick to throw together (aside from the 18-hour rise time!).

I’ve made dozens of no knead bread loaves, and with each new attempt I usually try something new such as added seeds or different flour (I highly recommend Dove’s Organic Strong Wholemeal Flour). Last week I was feeling ambitious and went for a variation of the Seeded Sour loaf posted on Breadtopia.com. The loaf contains quinoa, millet, amaranth and poppy seeds, plus a bonus seed coating on the outside. I didn’t have sourdough starter so I used yeast. The resulting loaf had a nice texture and I discovered how much I love poppy seeds. The only think I’d skip next time is the amaranth in the seed topping – it was a little crunchy for my tastes. Otherwise, the seed topping is awesome and I think I’ll use it for all of my loaves because it makes it easy to get the dough out of the bowl.

To make sense of what I’m talking about, visit Breadtopia and check out their recipe and video. I highly recommend watching the video; I learned so much just by watching the baker handle the dough and manage the seeds. It also gave me extreme baker envy as he had all these useful tools like a dough scraper and a “proofing” bowl. The same page also contains three other no knead variations that might suit your fancy.

skitched-20080629-210218.jpg
Tempting Textures: Quinoa, Amaranth, Poppy and Millet

Four-Seed No Knead Bread

30 grams rye flour
70 grams strong whole wheat bread flour
370 grams strong bread flour
1 1/2 tsp. salt
3 1/2 tsp. quinoa
3 1/2 tsp. millet
2 Tbs. amaranth
1/2 Tbs. poppy seeds
1/4 tsp. yeast
350ml water
2 Tbs. yogurt

Seed Topping Ingredients:

1/4 cup sesame seeds
1 1/2 Tbs poppy seeds

Combine all dry ingredients (except the topping ingredients) and mix with the combined wet ingredients. Stir until the dough has the consistency of a shaggy ball, adding more water if necessary. Cover the bowl with plastic wrap. Let the dough rest in a warm place for at least 12 hours (and up to 24 hours. The dough is ready when it’s about double in size and spotted with big bubbles.

Give the counter top and your hands a generous sprinkle of flour. Turn the dough onto the counter. Pull the dough at either end to form a strip. Fold this strip into thirds (like a business letter). Give the dough a quarter turn and fold in thirds again. I’ll refer to these folds as “seams”, i.e., “right now your dough is on the counter, seam side up.” Cover with plastic wrap and let rest about 15 minutes.

Oil a large bowl with olive oil. Add the seed topping ingredients in the bowl and swish the bowl around until the inside is covered in seeds. Put the dough ball into the bowl seam side down. Cover with the plastic wrap and let sit for 2-3 hours. The dough is ready when it has more than doubled in size.

Preheat the oven to 450 degrees. Put a 6- to 8-quart heavy covered pot (cast iron, enamel, Pyrex or ceramic) in oven as it heats. When the dough is ready, remove the HOT pot and pour in a bit of olive oil. Swirl it around so that oil covers the entire inside of the pot. Now, take the bowl containing the dough and quickly turn it upside down over the pot so that the dough falls in seam side up. Cover the pot with a lid and bake for 40 minutes. Then remove the lid and bake another 5 or so minutes, until the loaf is browned and the seeds are toasted. Cool on a rack at least 45 minutes before slicing.

No Knead Recipe Variations
No knead Bread – Jim Lahey’s original recipe

Recipe

Seeded Whole Wheat No Knead Bread

March 9, 2008 · By Monica Shaw

Seeded Whole Wheat No Knead Bread

Tim and I both agree that this is the best batch of no knead bread ever to emerge from our oven. It’s a perfect balance of sunflower seeds, flax seeds, white and whole wheat flour. The nuttiness of the seeds and whole wheat is buttery and wonderful. The white flour gives the bread a spongy lightness. But everything really comes together with the crust. I coat the entire dough ball in olive oil (a delicious trick I discovered accidentally and is much more effective than Jim Lahey’s cornmeal technique) then sprinkle on a generous dose of sesame seeds.

Seeded Whole Wheat No Knead Bread

300g white flour
170g whole wheat flour
1/4 cup sunflower seeds
1/4 cup flax seeds
1/4 teaspoon instant yeast
13g salt
olive oil
sesame seeds

  1. In a large bowl combine flour, seeds, yeast and salt. Add 350 grams of water and stir. Add more water a little bit at a time and stir until the dough has the consistency of a shaggy ball. Cover the bowl with plastic wrap. Let the dough rest in a warm place for at least 12 hours, preferably closer to 24. The dough is ready when it’s about double in size and spotted with big bubbles.
  2. Give the counter top and your hands a generous sprinkle of flour. Turn the dough onto the counter. Pull the dough at either end to form a strip. Fold this strip into thirds (like a business letter). Give the dough a quarter turn and fold in thirds again. I’ll refer to these folds as “seams”, i.e., “right now your dough is on the counter, seam side up.” Cover with plastic wrap and let rest about 15 minutes.
  3. Oil a large bowl with olive oil. Lightly dust the dough ball with flour and put it into the bowl seam side down.  Sprinkle the top with sesame seeds.  Cover with the plastic wrap and let sit for 2-3 hours. The dough is ready when it has more than doubled in size.
  4. Preheat the oven to 450 degrees. Put a 6- to 8-quart heavy covered pot (cast iron, enamel, Pyrex or ceramic) in oven as it heats. When the dough is ready, remove the HOT pot and pour in a bit of olive oil. Swirl it around so that oil covers the entire inside of the pot. Now, take the bowl containing the dough and quickly turn it upside down over the pot so that the dough falls in seam side up. Cover the pot with a lid and bake for 40 minutes. Then remove the lid and bake another 5 or so minutes, until the loaf is browned and the sesame seeds are toasted. Cool on a rack at least 45 minutes before slicing.

Recipe

Malted Grain Loaf: Best Loaf Ever?

November 5, 2009 · By Monica Shaw

Malted Grain Loaf

I’ve recently become hooked on the Channel 4 series River Cottage, a program featuring Hugh Fearnley-Whittingstall’s adventures as a downshifted cottage smallholder. One of the show’s main aims is to inspire people to live a more sustainable lifestyle by making simple changes to their eating habits. A recent episode featured baker “Ted” who demonstrated to busy mom “Sarah” how easy it is to bake bread.

I’ve been baking my own bread for a while, but my technique primarily relies on the no knead method which, while delicious, doesn’t quite reach the crusty, artisanal heights that I want it too (it also doesn’t toast well for some reason). Ted’s malted grain loaf caught my attention – it looked crusty and delicious, with lovely slashes on top and a dark, but light and fluffy interior. Last Tuesday, I decided to attempt this recipe for myself, and already I’m on to loaf #2: this stuff is incredible.

I’m posting the recipe here, but I highly recommend watching the video to get an idea of how it should look at the various stages of the baking process. It’s really simple. And if you wonder if you have time to spend 10 minutes kneading dough – you do. It takes more time to go to the store and buy crappy bread. This stuff toasts like a dream. Is it the flour? Is it the balance of ingredients? Is it the oven temperature? I’m not sure, but I’m looking forward to experimenting with different flours to find out.

Malted Grain Loaf

From The River Cottage.

500g malted grain flour (I used Doves Farm Organic Malthouse Bread Flour)
5g dried yeast
10g fine sea salt
300ml warm water
About 1 tbsp melted butter, or rapeseed or olive oil
Rye flour, for coating (optional)
Combine the flour, yeast and salt in a large mixing bowl. Add the water and mix to a rough dough (I recommend using your hands). Add the butter or oil and mix well. Adjust the consistency if you need to with a little more flour or water to make a soft, easily kneadable, sticky dough.

Turn the dough out on to a work surface and knead until smooth and satiny – roughly 10 minutes (or if you have a blender with a dough hook, use that). Cover the bowl with cling film and leave until doubled in size – anywhere from 45 minutes to 90 minutes, possibly even longer (here’s a picture of what it should look like when ready).

Deflate (‘knock back’) the dough by tipping it on to the work surface and pressing all over with your fingertips. Then shape the dough into a loaf, dusting it with a little rye flour if you have some (the video demonstrates this very well). Transfer to a well-floured board, linen cloth or proving basket, lay a plastic bag over it and leave to prove, until almost doubled in size again.

Preheat the oven to 250°C/Gas Mark 9 (or at least 220°C/gas 7, if that’s your top limit), then put a pizza stone or baking tray in to heat up. Have ready, if possible, a clean gardener’s spray bottle full of water – you’ll be using this to create a steamy atmosphere in the oven, which helps the bread to rise and develop a good crust. (You can achieve the same effect with a roasting tin of boiling water placed on the bottom of the oven just before you put the loaf in – but the spray bottle is easier.)

Transfer the loaf to the hot tray, removed from the oven. Slash the top, if you wish, with a serrated knife. Put the loaf into the hot oven and give a few squirts from the spray bottle over and around it before closing the door as quickly as you can.

Bake for 10 minutes, then reduce the heat to 200°C/gas 6 and continue baking until well browned and hollow-sounding when tapped – around 30 minutes.

Leave to cool completely on a rack before slicing.

Food Diary

Friday Foodie Highs and Lows

October 17, 2009 · By Monica Shaw

Taking a rest weekend from walking and such. Been feeling a bit under the weather and sore in the ankle. But not too sore for food. It was a day of ups and downs in the meal department. Breakfast featured a special treat: creme fraiche. And the afternoon’s tart experiment was fairly successful. But dinner disappointed – I made potato pancakes with red onion instead of yellow onion and it just wasn’t the same. But what can you do? Have dessert I guess!

Food and Exercise Log | Friday, October 16, 2009

Breakfast

Buckwheat crepes with fresh fruit and creme fraiche

Buckwheat Crepes with Fruit and Creme Fraiche

The creme fraiche was a real treat, especially with the raspberries (and a bit of raspberry jam).

Recipe: Buckwheat crepes

Snack

Leek and Mushroom Tofu Tart

Tart tasting

A small taste to sample the tart experiment.

Lunch

Leek and Mushroom Tofu Tart with Bread and Salad

Mushroom and Leek Tofu Tart

I guess the tart passed the test. We had this for lunch with salad and some fresh baked no knead bread.

Snack

Tart Infusion #3

Tart snack

Dinner

Potato pancakes with white bean croquettes and cabbage salad

Potato pancakes, white bean croquettes and cabbage slaw

Kind of disappointed by this meal. The croquettes were too dry. The potato pancakes were not the same with red onion instead of yellow. But the slaw was delicious, as was the tofu dip (with chives, adapted from Veganomicon‘s horseradish and dill dip) and apple sauce and homemade apple sauce.

Recipes:

Potato pancakes (the yellow onion is important!)
Winter Slaw with Red Cabbage, Apples and Pecans

Recipe

VeganMoFo: Naturally Vegan Seed Bread

October 12, 2009 · By Monica Shaw

Wholemeal Seed Bread

This recipe is a little more complicated than my usual whole wheat no knead bread, but the effort is so worth it. And really, the only extra step is a bit of kneading. This bread toasts beautifully and is my new favorite breakfast food.

Whole Wheat Seed Bread

Adapted from bobsredmill.com.

1/4 cup flax seeds (aka linseed)
1/4 cup sunflower seeds
1/4 cup sesame seeds
2 Tbsp poppy seeds
2 tsp salt
2 cups warm water
1 Tbsp honey or other sweetener (I use agave nectar)
1/4 cup vegetable oil (I use grapeseed oil)
1 Tbsp active dry yeast
1 cup strong white flour
3-4 cups strong wholemeal four

In a large mixing bowl, combine the seeds, salt and yeast, then add the 2 cups of warm water and stir with a whisk to blend. Add the honey and oil to the bowl and mix well.

Add the white flour and 3 cups of the wholemeal flour to the mixing bowl and combine well. The dough should be stiff enough to hold a shaggy ball shape in the bowl. If it’s too wet, add more wholemeal flour. But don’t go too crazy with the flour – it’s better to err on the side of too wet than too dry.

Now you need to knead the dough for about 10 minutes. I use a blender with a dough hook attachment and knead it right in the bowl, but you could also use your hands and knead it on a well-floured surface. You should knead the bread until it’s fairly smooth. If it’s still really sticky after 10 minutes, add a bit more flour until it becomes smooth!

Oil he mixer bowl and place dough back in it. Cover and let rise until doubled.

Turn the dough out onto a floured surface and either divide it into two loaves or leave it as one giant loaf (warning – one giant loaf tends to come out looking a bit like a “cowpie”, but it tastes delicious no matter what!). Shape the dough into a round or oblong loaf and place on a cookie sheet (or place it into an oiled bread tin). Cover and let rise again until doubled.

Bake at 35-45 minutes in a preheated 350F/180C oven. Keep in eye on it – it’s done when the loaf has turned golden brown and sounds “hollow” when you tap it on the bottom.

Remove from oven and cool on a cooling rack. Slice and enjoy! This bread toasts very well and tastes super yummy with nut butter and jam.

Food Diary

Two crepes, three beans and a jungle gym

October 9, 2009 · By Monica Shaw

Apple Crepes with Soy Yogurt, Bananas and Blackberry SyrupToast with optionsImpromptu flatbreadThree Bean SaladBean and Potato Taco with Corn and Cabbage Slaw

I’ve started using the Monkey Bar Gym’s portable Jungle Gym in my morning workout routine. It came with a beginner’s strength training circuit that I’ve been working through once a week. Feels good to have some guidance, but I still need to work out a plan for the rest of the week.

On the food front, I can’t complain. A few random notes on things:

  • The buckwheat crepes are really good when their filled, then cooked in a dry pan until crisp
  • No knead bread continues to rock my world
  • Leftover pizza dough makes really tasty flatbread, especially when basted with olive oil and garlic
  • Mark Bittman’s broiled three bean salad recipe from How to Cook Everything Vegetarian puts all other three bean salads to shame
  • Tacos continue to be one of my ultimate comfort foods, next to pizza and reuben sandwiches (what is it about eating with my hands that I find so comforting?)

Food and Exercise Log | Thursday, October 8, 2009

Strength Training with the Jungle Gym

I warmed up with 10 minutes of skipping then hit the jungle gym, repeating this circuit twice:

12x assisted pull-ups
12x angle push-ups
12x assisted dips
12x chest presses

Breakfast

Apple Crepes with Soy Yogurt, Bananas and Blackberry Syrup

Recipe: Vegan buckwheat crepes

Snack

Almond butter on toast with raspberry jam and honey

Toast with options

Lunch

Three bean salad with crispy flatbread

Three Bean Salad with Flatbread

Recipe: Broiled three bean salad recipe from How to Cook Everything Vegetarian

Walk

Three loops around the fields out back. ~1h20m of walking. Not sure on the mileage.

Snack

Organic pear and a cuppa tea

Consumed in bed while I worked. No picture could capture the sweet bliss of working and eating from bed.

Dinner

Bean and potato tacos with corn and cabbage slaw

Bean and Potato Taco with Corn and Cabbage Slaw

Uncategorized

Grilled Tofu Kebabs with Muhammara Slather

September 29, 2009 · By Monica Shaw

Tofu kebabs waiting for their Muhammara slather

I’m trying a new blogging technique: quick posts. Why? Because one is better than zero, and I’ve been hard pressed for time these past few weeks. (Who ever thought that living in the countryside would be so busy? The upshot: it’s a good sign that I’m getting some good work done.)

But back to my point: tofu kebabs. This was a first for me – Heidi’s Favorite Grilled Kabob recipe is now one of my favorites, too. The secret is in the sauce: her Muhammara “slather”, a Middle Eastern spread made with toasted walnuts and roasted red pepper (among other things), is phenomenal. I’ll let her explain:

The great thing about it (in addition to how it tastes) is that it’s multi-purpose spread, slather, sauce, dip, etc, that can deliciously accent not only kabobs, but many of your favorite dishes. Toasted walnuts round out the flavor of the beautiful red pepper base, and a rich splash of sweet pomegranate molasses lends a subtly sweet backnote to the red chiles. I suspect this is a traditional recipe that bends to the taste of the cook preparing it – my version is lighter on the cumin and red peppers than some of the other recipes you might come across. You can easily make it thicker or thinner depending on how you are going to use it.

Heidi’s kebabs consist of tofu, lemon, onion and mushrooms. For lack of mushrooms I used eggplant instead. It was super easy – just skewer the veggies, apply oil and salt, then grill. The Muhammara gets added at the end. I served the kebabs and sauce with grilled corn and whole wheat no knead bread. This is what vegan cooking is all about: good, wholesome food that’s not pretending to be anything but delicious.

Recipe: Tofu Kabobs with Muhammara Slather

Tofu kebabs with Muhammara slather

Food Diary

Ode to Cabbage Salad

September 15, 2009 · By Monica Shaw

Rainbow Cabbage Slaw

I seem to be eating a lot of cabbage lately. We get a head of the green stuff every week in the organic box and it seems to last forever. Since the weather’s been warm and sunny, my tastes tend towards raw, cold and crispy, so various permutations of cabbage salad (i.e. cole slaw) have been gracing my plate.

Cabbage salad makes me super happy. I like to shred all the cabbage in one go (not in the box shredder, but with a knife – here’s how), then store the extras in the fridge for quick cabbage salad goodness whenever I feel like.

So what can one person do with that much cabbage without getting bored? Here’s a few ideas:

  • My favorite cabbage salad recipe is this Oriental Cabbage Salad, made with a sweetened cider vinegar dressing and toasted sesame seeds. The original recipe (a Shaw family classic) calls for uncooked ramen noodles to be added to the mix, though I tend to leave these out because they’re really weird and bad for you. But I gotta admit, the ramen noodles add a nice savory crunch. Then again, so do toasted sesame seeds!
  • Lime and chili cabbage slaw – I’ve been eating a lot of this because it’s just so easy. Cabbage, cilantro, lime juice, olive oil, chili, salt. And if you really can’t be bothered chopping anything, lime, oil and salt would do just as well.
  • Celery seeds. They kick up just about any cabbage salad. Case in point: Amish Slaw.
  • From my friend, Brant: Grate a head of purple cabbage, one sweet onion and a carrot. Add some finely jalapenos. Mix all that together and then dress with about 1/2 a cup of 1:1 rice/apple cider vinegar, a little olive oil, some salt and pepper.

And speaking of cabbage, Monday saw a double dose of my green-leafed friend, both cooked and uncooked. Read on for the details…

Food and Exercise Log | Monday, September 14, 2009

Breakfast

Whole wheat toast with peanut butter and fresh fruit

Toast with fruit and peanut butter

Recipe: Whole Wheat Seed Bread [Bob’s Red Mill]

Snack

Leftover savoy cabbage thoran

Savoy cabbage thoran

This is one of my favorite recipes from from Das Sreedharan’s “The New Taste of India”. It’s even good as a mid-morning snack!

Lunch

Black bean taco with pineapple salsa and cabbage salad

Black bean taco with pineapple salsa and cabbage salad

Recipes:

  • Simmered Black Beans [New York Times]
  • Lime and Chili Cabbage Slaw

Walk

A nice walk around the fields behind the cottage. About an hour and 20 minutes.

Dinner

Mixed grill bonanza

Mixed Veggie Grill

Grilled pineapple, mushrooms, onions and red pepper with a tomato, cucumber and red onion salad, plus avocado and no knead bread. This meal rocked!

Recipe: “Faster” No Knead Bread [New York Times]

Food Diary

Broad Beans Galore

July 30, 2009 · By Monica Shaw

Broad Beans

Broad beans are a popular summer staple here in Britain, so it’s no surprise they’ve made regular appearances in our weekly veg box from Riverford Organic Veg. I have little experience with these podded beasts, so last night I decided to take the plunge and try a broad bean soup off of the Riverford website.

Dinner: Broad Bean and Mint SoupThe recipe appealed for both its inclusion of mint and its short list of ingredients. However, what it lacked in complication it made up for in prep time. The soup itself was a cinch, but podding the beans and then removing their tough outer skins was a beast. It’s definitely an exercise to be completed over a good podcast (or better yet, with the help of a few friends).

How to de-skin broad beans:

  1. Pod the beans.
  2. Cook them in boiling water for 1 minute.
  3. Plunge them into cold water, to cool them.
  4. Make a nick in the top of each bean, with your thumb nail.
  5. Gently squeeze the bright green bean out of the skin.

Fiddly, but worth it. The soup was fab, and everything (except for the mint) was made with ingredients from the box. Scroll to the bottom of this post for the recipe, and enjoy a bit of food porn along the way…

Food and Exercise Log | Wednesday, July 29, 2009

Wednesday’s log is a bit “light” on the exercise part, thanks to a deluge of rain that made me more inclined to nap rather than walk. I hid inside for the most part, and with the exception of a couple skipping sessions in the home office, took it pretty easy.

Breakfast

Bircher Muesli with Carrot, Coconut, Pecans and Walnuts

Breakfast: Bircher Muesli with Carrots, Coconut, Pecans and Walnuts

Skipping

About 10 minutes of skipping following “The Jump Rope” FIT workout at the Monkey Bar Gym.

Lunch

Lentils and Greens with Tomato-Basil Garnish and Quinoa

Lunch: Lentils and Greens with Quinoa and Tomatoes

The “greens and beans” are another winning combo from Mark Bittman’s How To Cook Everything Vegetarian. Check out the recipe on Google Books: Beans and Greens .

Skipping

Another 10 minutes of skipping following “The Jump Rope” FIT workout at the Monkey Bar Gym.

Dinner

Broad Bean and Mint Soup with Toasted Bread and Salad

Dinner: Broad Bean and Mint Soup

No Knead Bread

Broad Bean and Mint Soup

This recipe comes from Anna Ross’s Green Cuisine, available for purchase on Amazon and Riverford Organic Veg.

500g (1lb) shelled broad beans
2 small onions
2 carrots
2 tbsp oil
1 litre (2 pts) vegetable stock
2 tbsp fresh mint
salt & pepper

  1. Peel and chop the onions and carrots and saute in hot oil for 10-15 minutes
  2. Stir in the broad beans and stock, cover and simmer for 20 minutes. Season with salt and pepper.
  3. Stir in the chopped mint, transfer to a liquidiser and blend until smooth.

Food Diary

Spinach, Strawberries and Salad

July 28, 2009 · By Monica Shaw

Food and Exercise Log | Monday, July 27, 2009

Breakfast

Bircher Muesli with Pecans and Fresh Apricots

Breakfast: Bircher Muesli with Apricots and Pecans

It’s been a while since I enjoyed my old friend, Bircher Muesli. It was good to be back, and this time with a twist – apricots and pecans, a new addition. I liked it!

Snack

No Knead Toast with Tahini and Honey

Snack: Toast with Tahini and Honey

Bike Ride

Trip to Cirencester – ~14 miles

Gmaps Pedometer.jpg

The fridge was looking pretty bare, but our car is in the shop and our next organic box doesn’t arrive until Tuesday. The nearest supermarket is almost 7 miles away in Cirencester, so I decided to take the opportunity to explore the country roads near our place. I was happy to find that the journey is overall extremely pleasant, following farms and fields for the most part. There is some traffic, but drivers were overall very polite and gave me plenty of room while passing. I’ll definitely be doing this again, whether the car is fixed or not, and now I’m thinking about other cycling possibilities in the area.

Lunch

Grilled Veggie Sandwich with Cabbage Salad

Lunch: Grilled Veggie Sandwich with Cabbage Salad

The sandwich: grilled onions, red peppers and a portobello mushroom with tomato, avocado, salt, pepper, sprouts and pesto.

The salad: Cabbage Salad with a simple cider vinaigrette, spring onions and toasted almonds

Not shown: A couple sneaky potatoes that I snacked on while cooking (I was famished after the bike ride).

Grilled Veggie Sandwich: Round 2

Lunch: Tall Food

It’s not at all surprising that I was hungry just a couple hours later (such is the problem with

Dinner

Brown Lentils and Potatoes with Spinach and Strawberry Salad

Dinner: Lentils and Potatoes with Spinach and Strawberry Salad

I love simple meals like these. And the salad is a special kind of awesome – super easy too. I’ve made a few of these now, adapting this recipe from allrecipes.com. Sometimes I use toasted almonds in place (or in addition to) the toasted sesame seeds. Raspberries also work well in here.

Spinach and Strawberry Salad

1 bunch spinach, rinsed and torn into bite-size pieces
1/2 red onion, thinly sliced
330 g sliced strawberries
60 ml vegetable oil
30 ml white wine vinegar
50 g white sugar
0.3 g paprika
9 g sesame seeds, toasted
4 g poppy seeds

In a large bowl, toss together the spinach and strawberries.

In a medium bowl, whisk together the oil, vinegar, sugar, paprika, sesame seeds, and poppy seeds. Pour over the spinach and strawberries, and toss to coat.

Food Diary

Running Deficits

May 28, 2009 · By Monica Shaw

This is one in a series of food photo diary posts in which I track my food in pictures. I’m also counting my calories. Read all about it in this post or click here to view my calorie intake in a nifty spreadsheet.

No wonder bodybuilders load up on protein shakes – it’s hard to run a calorie surplus when you rarely eat out, avoid processed foods, and simply do a little bit of movement every day. So it would seem that I’ve stumbled upon the secret to burning more calories than you consume: eat whole foods moderately, exercise a little bit, and commute on bike or on foot. Not only will you lose weight, but you can also afford daily treats like full-on cream, sugary jam, pumpkin pie and full-fat Greek yogurt.

I think I need to take better advantage of this treat allowance.

Diary for Tuesday, May 26, 2009

Calories in: 1577
Calories out: 2097
Deficit: 520 (whoops)

Breakfast

Vegan buckwheat crepes filled with cottage cheese and topped with fresh fruit, blackberry jam and soured cream

Cottage Cheese Crepes

Calories: 300
Protein: 14
Fat: 5.3
Carbs: 56

Breakfast #2

Brown no knead bread, toasted, topped with honey and cottage cheese. Served with a cup of decaf.

Cottage Cheese and Honey on Toast

Calories: 177
Protein: 10
Fat: 4.7
Carbs: 24.2

Lunch

Grilled tofu sandwich with chickpea salad and mixed leaves

Tofu Sandwich

Chickpea Salad

Calories: 424
Protein: 21
Fat: 16
Carbs: 50

Snack

Banana Yogurt Smoothie

Banana Yogurt Smoothie

Calories: 209
Protein: 15
Fat: 2.3
Carbs: 36

Dinner

Black Beans and Rice with Cabbage Slaw. Followed by yogurt, strawberries, and rooibos tea for dessert (not shown).

Rice and Beans!

Calories: 468
Protein: 25
Fat: 5.5
Carbs: 83

Diary for Wednesday, May 27, 2009

Calories in: 1687
Calories out: 1877
Deficit: 190 (not again!)

Breakfast

Bircher Muesli with Yogurt and Fruit

Blue Bircher Muesli

Calories: 321
Protein: 10
Fat: 8
Carbs: 56

Snack

Yogurt with homemade blackberry jam, mixed nuts, and a cup of tea.

(I skipped the apple.)

Emergency Snack

Calories: 170
Protein: 16
Fat: 4.2
Carbs: 17

Lunch

Avocado on Toast with Chickpea Salad and Raw Veggies

Chickpea Salad with Avocado on Toast

Calories: 395
Protein: 13
Fat: 16
Carbs: 55

Snack

Brown no knead bread, toasted, topped with honey and cottage cheese.

Cottage Cheese and Honey on Toast

Calories: 204
Protein: 7.7
Fat: 3.5
Carbs: 37

Dinner

Lentil bolognese with Whole Wheat Pasta, Bread and Salad.
No photo of dinner – I still don’t have the guts to photograph my food when eating with new people. I went to a dinner/workshop with the Open University. For cafeteria food, the OU rocks. They always seem to have something vegan, and it’s the kind of food I’d make for myself at home. My calorie estimates are a total guess.

Calories: 600
Protein: 26
Fat: 8.3
Carbs: 83

Older Posts
  • Facebook
  • Instagram
  • Pinterest
  • Twitter

Search

Eat Sleep Wild is our nature-based business in the Northwest of Scotland. Join me on a guided hike in Assynt, stay at our dog-friendly self-catering cottage, or join Mark on a stargazing evening under Scotland's darkest skies!

Writer's Residence is my website builder for writers - create an online writing portfolio in minutes!

Instagram

Instagram did not return a 200.

Follow Me!

About

  • About
  • Work with Monica
  • Contact
  • Smarter Fitter Smoothies

Follow Me

  • Facebook
  • Flickr
  • Instagram
  • Pinterest
  • Twitter

Search

Subscribe

Buy my book

Smoothie eBook

Copyright 2025 smarterfitter