• Home
  • Recipes
    • Vegan
    • Raw
    • Salad
    • Soup
    • Treats
    • Smoothies & Juices
      • My Awesome Smoothie Book
      • Favourite Products
      • Smoothie & Juice Recipes
      • Juicing Articles
  • Happiness
  • Adventures
  • Work with Me
smarterfitter

Search Results for: kale

Raw

Game Changing Kale Salad

February 5, 2015 · By Monica Shaw

#Imbolc salad. Made Seamus Mullen's #kale salad recipe from @food_writer's website. Freakin #awesome.

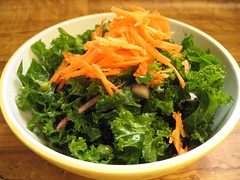
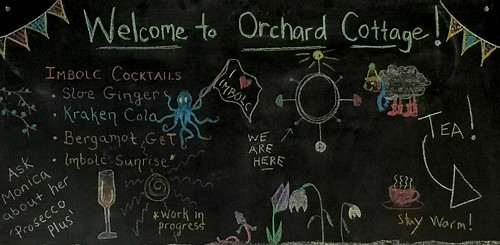
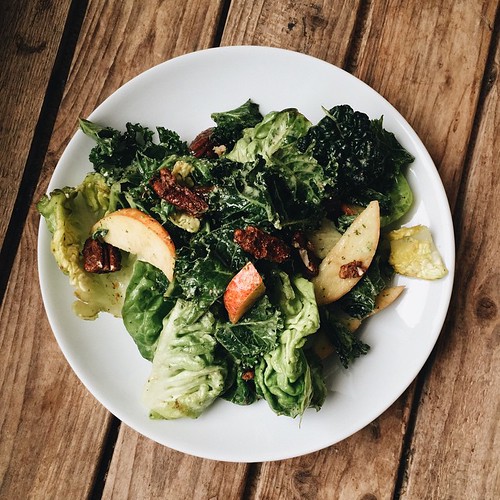
Last weekend was Imbolc, the halfway point between winter solstice and spring equinox, and an all-around good excuse to celebrate the season and have a party. The etymology of the word “Imbolc” is a little unclear, but most scholarly people agree it has something to do with ewe’s milk, thus making sheepy things a common symbol of this festival. For us food adventurers, this was all the excuse we needed to play around with sheep milk in various guises, and one of our biggest successes was this kale salad.

The recipe is a slight riff on Seamus Mullen’s Kale Salad with Apple, Toasted Pecans, and Yoghurt and Dill Dressing currently featured on Matching Food and Wine.

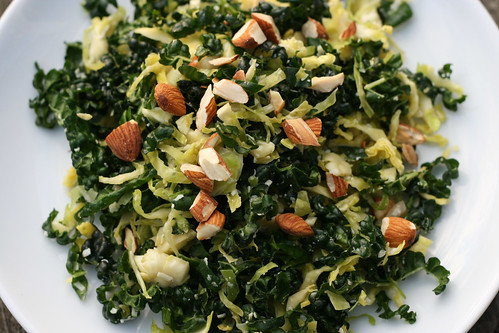
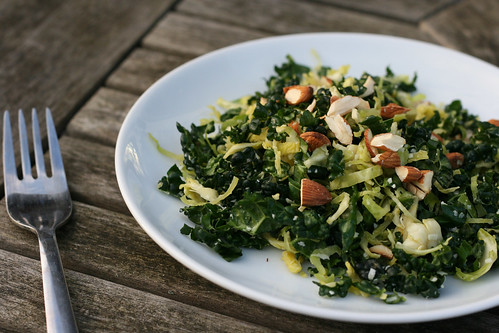
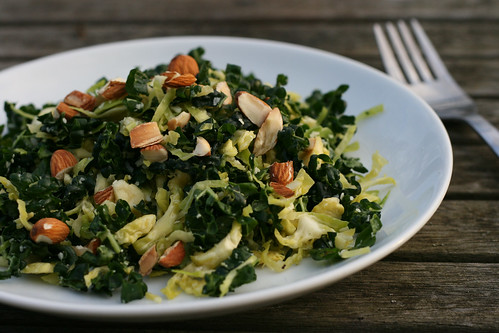
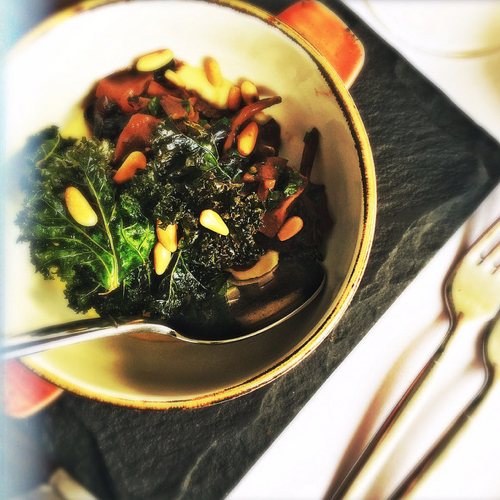
Three things make this kale salad awesome:

  1. The candied pecans – I used the recipe for spiced pecans from David Lebovitz’s Bourbon & Spiced Pecan Ice Cream. If you make this once, I promise you will be putting candied pecans on salads for the rest of your life.
  2. The dressing – Here is where we deviated ever so slightly from the recipe, using Woodlands sheep yogurt in place of cow milk yogurt. It worked a treat. Dill and yogurt aren’t an obvious choice for a kale salad dressing, but it totally works. YES, even with those candied pecans.
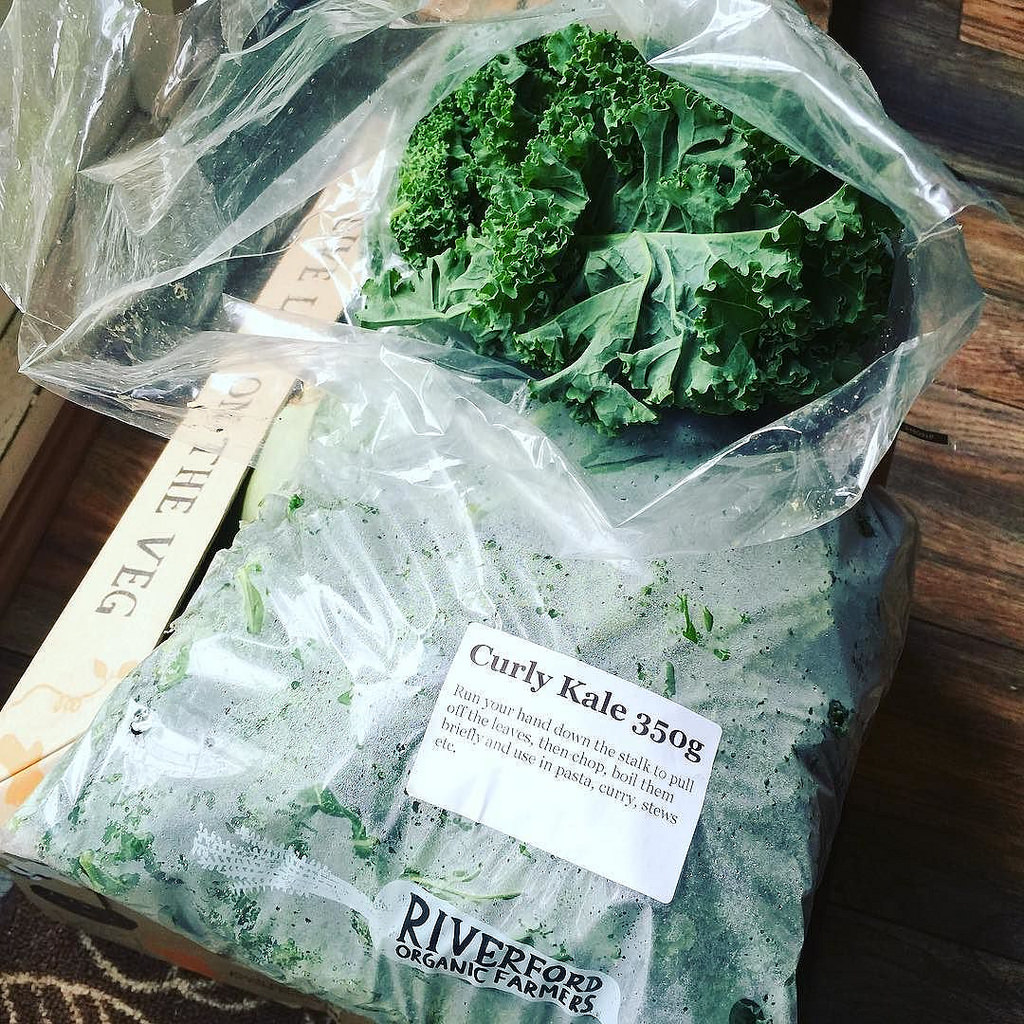
  3. The kale! In particular, the cavalo nero from The Organic Farm Shop in Cirencester. Almost zero food miles and totally delicious. Seasonal to the max.

It’s worth pointing out that this kale salad required no “massaging”, kale chipping or other trendy kale techniques to make it spectacular. It’s all about the ingredients and the perfect combination of flavours. Sweet, sour, savoury. If Imbolc actually did have a God, Seamus Mullens might be it.

This salad isn’t a life changer per say, but it is a game changer in that it’s raised the bar for my usual big kale salad routine, which up until Imbolc had been average at best. It reminds me of something worth aiming for when cooking for other people: the element of surprise. And it also reminds me to experiment with flavors and try other people’s recipes, even if they do sound weird.

So does anyone else have a crazy weird awesome kale salad for me to try?

Get the recipe:

Seamus Mullen’s Kale Salad with Apple, Toasted Pecans, and Yoghurt and Dill Dressing [matchingfoodandwine.com]


Food Diary

Clean Detox Day 13: Greens, beans and more crispy kale

September 11, 2013 · By Monica Shaw

Clean detox day 13

Breakfast: “Green smoothie” with mango, peach, kale, avocado, fresh ginger & mint.

Lunch: Black beans, quinoa, mexican slaw, avocado. Could have used some salsa!

Dinner: Pureed carrot and chickpea soup with crispy kale and tahini sauce.

I really feel like I’m on a roll with the soups and smoothies. Also, I could probably eat crispy “kale chips” every day.

Clean detox day 13

Related Links:

  • What this Clean Detox is all about
  • Kale chips [davidlebovitz.com]
  • Carrot soup with tahini and crisped chickpeas [smittenkitchen.com]
  • Clean Program Manual [cleanprogram.com]
  • Clean Program Recipes [cleanprogram.com]
  • Clean Program Meal Plan [cleanprogram.com]

Recipe

Raw Kale and Brussels Sprouts Salad

February 19, 2012 · By Monica Shaw


Raw Kale and Brussels Sprouts Salad

If you know me at all then you I’m a bit of a kale addict.

Raw kale salad features prominently on my lunch menus. My usual approach is simple: finely chopped raw curly kale tossed with lemon juice, olive oil, salt and pepper. Sometimes I add orange wedges, red chilli and sunflower seeds. Other times I add red onion and carrots. Sometimes I add boiled eggs, beans, tofu, tempeh, or bulgar wheat.

This weekend I discovered that Tuscan Kale, aka ‘Cavolo Nero’, is also great in raw salads. A family friend sent this recipe, which sounds like a weird melange of ingredients: Tuscan kale, brussels sprouts, pecorino and almonds in a lemon vinaigrette. Does this really go together?

It does. You’ll just have to trust me and try it. The key is to shred the kale and sprouts very finely. I use my hands to really rub the dressing into the leaves and then give it a half hour to soak in. You could skip the cheese and make it vegan, but I don’t think it would be as good (sometimes those are the breaks!).

Raw Kale and Brussels Sprouts Salad

If you’ve never had raw kale salad before, this is a pretty good place to start. I suspect it would work well with curly kale, too, or cabbage in place of the brussels sprouts. Ah but that is the beauty of salads, isn’t it? Endless adaptation. Anyone who thinks salad is just a big pile of leaves is just wrong!

Raw Kale and Brussels Sprouts Salad

Adapted from a recipe from a family friend. Made with Tuscan “cavolo nero” kale.

Ingredients

  • 1/4 cup + 2 Tbsp extra-virgin olive oil
  • 1/4 cup fresh lemon juice
  • 2 tablespoons Dijon mustard
  • 1 tablespoon minced shallot
  • 1 small garlic clove, finely grated
  • 1/4 teaspoon salt plus more for seasoning
  • Freshly ground black pepper
  • 2 large bunches of Tuscan kale / cavolo nero (about 1 1/2 lb. total), center stem discarded, leaves thinly sliced
  • 12 ounces brussels sprouts, trimmed, finely sliced or shredded
  • 1/3 cup almonds with skins, coarsely chopped
  • 1 cup finely grated Pecorino, Parmesan, Grano Padano or other hard Italian cheese

Method

  1. Make the dressing: Combine olive oil, lemon juice, Dijon mustard, shallot, garlic, 1/2 tsp. salt, and a pinch of pepper in a small bowl. Whisk to blend then set aside to let the flavours meld.
  2. Toast the almonds in a skillet over medium-high heat until golden brown.
  3. Mix thinly sliced kale and shredded brussels sprouts in a large bowl. Toss with the salad dressing (add as much dressing to suit your tastes – you may not need it all). Use your hands if you like to really rub the dressing into the leaves. Toss in the cheese and, if you’re patient, put the salad in the fridge for 30 minutes or so to marinade a bit. Taste and season with salt and pepper if needed.
  4. Serve garnished with toasted almonds.

Prep Time: 30 minutes

Cook time: 5 minutes

Yield: 10 servings

Per serving: 195 Calories | 15.3 grams Fat | 8.7 grams Carbohydrates | 8.1 grams Protein | 3.3 grams Fiber

Raw Kale and Brussels Sprouts Salad

Recipe

Seasonal Food: Kale

October 15, 2008 · By Monica Shaw

Raw Kale SaladI’m one of those rare people who actually enjoy eating their greens, especially when it comes to kale.

Kale is from the Brassica oleracea family, just like cabbage and brussel sprouts. This hearty green vegetable is delicious, versatile, and like all leafy greens, highly nutritious! Kale is very high in vitamins A, C and E, and is also full of sulfer-containg phytonutrients which are thought to lessen the occurrence of a wide variety of cancers, including breast and ovarian cancers.

Scrambled Tofu with Kavelo NeroMe? I love kale for its flavor and texture. There are several varieties of kale, including curly- and plain-leaved, but my favorite is is cavolo nero, also known as “black cabbage” or “Tuscan kale”. I’ve never seen it in US supermarkets but it’s popular here in London.

Last year, my favorite way to prepare kale was simple: lightly steamed with salt and pepper. When served with a bit of brown rice and lentils, you get a complete meal that is somehow comforting in its simplicity.

At least I think so, anyway.

This year, when I got my hands on the first kale crop, Tim asked me a simple question:

“Can you try to make them yummy this time?”

I guess not everyone shares my enjoyment of pure and simple kale.

Lentils, Rice and Curly Kale

Very well. I can appreciate a little flavor boost. So I’ve been experimenting…

  • Stir-fried garlic and kale never fails.
  • Even better is kale stir-fried with caramelized onion.
  • For a spicy kick, top steamed or boiled kale mixed with roasted chili and caramelized onion garnish
  • When all else fails, greenophobes can hide their kale in a big pot of soup or chili.
  • Kale also makes a great addition to tofu scrambles!
  • Kale pairs nicely with carrots. What do I mean? Read on…

One pairing I can definitely recommend is kale and carrots. In both stir-fries and salads (yes, kale can be eaten raw!), the sweetness of the carrot is a nice balance to the earthiness of the kale. Here are a couple recipes that take advantage of this combination.

Curly Kale With Carrots, Raisins, Walnuts and Chili

Curly Kale with Onions, Carrots, Raisins, Walnuts and Chili

1 tablespoon olive oil
1 onion, sliced into thin rounds
2 carrots, julienned
10 raisins
5 walnuts, crumbled into pieces
4 cups kale, de-stemmed and chopped
1/4 teaspoon crushed red pepper flakes (optional)
salt
Heat oil in a large pan. Add carrots, onions, raisins, walnuts and chili and saute until onions are soft.

Add the kale, salt and a couple tablespoons of water. Cover pan with a lid.

Check the kale after a couple of minutes. Add more water and cook longer if necessary.

Raw Kale and Carrot Salad

Raw Kale Salad

200g curly kale, chopped
2 tbsp flax oil
juice of 1 lemon
2 carrots, shredded
1 red onion, sliced
salt to taste
cayenne pepper to taste
Combine all ingredients. Allow to marinate in the refrigerator for several hours before serving.

Main Course

Sous vide chicken with sumac, za’atar and preserved lemon

August 16, 2017 · By Andrew Burtenshaw

Chicken with sumac, za'atar and preserved lemon

Inspired by Ottolenghi’s Roast chicken with sumac, za’atar and lemon, from Ottolenghi: The Cookbook.

We’ve been trying to cook everything we can lay our hands on with our new(ish) Optimum Sous Vide, and it has become a staple of our kitchen counter. We’ve been a big fan of Ottolenghi’s Roast chicken with sumac, za’atar and lemon for a while, and when I was tasked with doing something interesting for dinner with a couple of chicken breasts the other night, I started experimenting. The results with the sous vide were incredible, so I thought I’d share my recipe.

Be aware that this was very much a riffed dish, and because it was created on the fly, the quantities for some of the ingredients (like oil and spices) are my best estimates. You may want to adjust the quantities to suit your preferences and the way the food behaves with your equipment.

Because the chicken breasts I used were so large, we had enough for leftovers the next day. We served that with a wholewheat couscous concoction and a spinach salad. Photos to follow below.

Sous vide chicken with sumac, za’atar and preserved lemon

Ingredients

For the chicken and sauce

  • 2 large chicken breast fillets or chicken supremes, skin on
  • 2 red onions, thinly sliced
  • 4 garlic cloves, crushed
  • 4 tbsp olive oil, plus extra for drizzling
  • 1 tbsp white wine vinegar
  • 1.5 tsp ground allspice
  • 1 tsp ground cinnamon
  • 1 tbsp sumac, plus extra for garnishing and searing
  • Preserved lemon, equivalent to 1 lemon, finely chopped
  • 200ml chicken or vegetable stock
  • Salt
  • Freshly ground black pepper
  • 2 tbsp za’atar, plus extra for garnishing
  • 40g unsalted butter
  • 50g pine nuts
  • 1 large handful of freshly chopped flat-leaf parsley
  • Finely grated zest of half a lemon

For the tahini and yoghurt sauce

  • 2 tbsp tahini
  • 100g strained Greek yoghurt
  • Juice of half a lemon
  • 1 garlic clove, crushed
  • Salt
  • White pepper
  • 1 tsp freshly chopped flat-leaf parsley
  • A pinch of sweet paprika
  • Olive oil for drizzling

Special equipment

  • Sous vide cooker/water bath
  • Vacuum sealer

What to do

For the tahini and yoghurt sauce

  1. Mix the tahini, yoghurt, lemon and garlic in a small bowl.
  2. Add a very small amount of tap water and mix until the sauce is the consistency of a thick, unstrained yoghurt.
  3. Season to taste with salt and white pepper.
  4. Place in a fresh small bowl and garnish with the chopped parsley, a pinch of sweet paprika and a drizzle of olive oil.

For the chicken and sauce

  1. In a large bowl, mix half of the crushed garlic with 2 tbsp olive oil, the white wine vinegar, allspice, cinnamon, sumac, za’atar and half of the preserved lemon. Top up with 60ml water, and season with salt and black pepper to taste. Adjust the ratio of the spices to taste, place the chicken in the bowl, and marinate in the fridge for at least an hour, preferably more.
  2. Pre-heat the water bath to 60 degrees Celsius.
  3. Place the chicken breasts or supremes into two appropriately sized sous-vide bags with 1 tablespoon of the marinade in each bag and seal under full vacuum. Set aside the rest of the marinade.
  4. Place the vacuum bags into the water bath for 45 minutes.
  5. Meanwhile, in a heavy, cast-iron skillet, heat the remaining 2 tbsp olive oil on a medium/high heat and fry the onions and the remainder of the garlic together until the onions are beginning to dry out and brown. Stir the onions and garlic constantly during this time.
  6. Meanwhile, in another smaller skillet, melt half of the butter under a moderate heat, and fry the pine nuts and a pinch of salt, stirring constantly, until they become golden. Set aside.
  7. Once the onions have started to dry out and brown, lower the heat to medium and add the remainder of the butter, a pinch of salt and the remainder of the chopped preserved lemon, to taste. Stir for a couple of minutes until the butter melts and you can smell the aroma of the preserved lemons. Add the remainder of the marinade that you set aside earlier and the stock, then stir. Allow the sauce to reduce slightly for up to ten minutes. Taste, and add further spices or adjust the seasoning depending on your preferences. Cover and set aside until the chicken is ready.
  8. Once the 45 minutes for the chicken has completed, remove the vacuum bags from the water bath. Open them, being careful to retain any juices. Set the chicken aside and pat dry with paper towel, and mix the retained juices from the bag into the skillet with the onions.
  9. Gently bring the onions back up to temperature, covered, and heat another heavy cast-iron skillet on a high heat with a small amount of olive oil.
  10. Sear the chicken breasts individually, starting with the skin side. Sear for 1.5-2 mins on the skin side, until golden and crispy, and for 1 minute on the non-skin side. Do not dry out the chicken, having taken so much care to cook it perfectly in the sous-vide. You just want to brown the exterior to develop the flavours associated with seared meat, because this won’t have happened during the sous-vide part of the process.
  11. Take the onions off the heat and place the chicken breasts in the skillet with them. Spoon the onions and sauce over the chicken breasts, and garnish with the pine nuts, chopped parsley, sumac, za’atar and lemon zest. Drizzle with olive oil and serve with the tahini and yoghurt sauce, bulgur wheat and a robust kale salad. Eat with gusto and don’t forget to pick something nice to drink with it.
Sous vide chicken with sumac, zaatar and preserved lemon

My leftovers, in all their fresh, punchy and zesty glory!


Happiness

7 Ways to Pimp Your Outdoor Space

July 10, 2017 · By Monica Shaw

We love to be outside as much as possible, and that includes at home in the garden as much as it does in forests and mountains. Before Andrew moved in, the OC garden was a bit of an empty – and very weedy – canvas. But over the last year we’ve slowly made improvements that have now made it an extension of our own living room. It’s a place to relax, cook, eat, read, and sometimes even work if it’s a particularly nice day.

So, how do you make your outdoor space a place where you want to spend loads of time? Here’s our suggestions…

Grow Vegetables

Even just a couple pots of potted herbs will do. We have two raised beds and a bunch of pots for growing things in: broccoli, greens, fresh herbs, lettuces, kale, chillies, fennel, and more favourite veggies. A veggie garden fills your outdoor space with colour and life, and it also offers inspiration for actually getting outside and spending time in it. You’ll also marvel by how big certain plants get – I was not expecting this pumpkin to take up so much space!

Install a Fire Pit

This has been one of the great achievements of the year! All we did was create a big circle of stones on the grass and lit a fire to kill the grass in the middle. Done! If you’re uneasy about damaging the grass, get a brazier that sits off the ground. Also, keep a nice stockpile of logs around. Tree surgeons are often a great source of bulk firewood – we can recommend Target Trees in Norfolk.

Get a Bird Feeder

We have a bird feeder positioned outside of our kitchen window with feeders for nuts, seeds, and suet balls. Just like the veg garden, a bird feeder brings life to the garden, and birds are fun to watch. My favourite visitor is the local woodpecker.

Get a Barbecue

I know there’s nothing better than cooking with coal but if you can afford it, get a gas BBQ for those days when you just don’t have time to wait an hour for the coals to be ready. A gas BBQ is super enabling for all kinds of outdoor cooking hijinks. And it keeps the mess out of the kitchen!

Nurture Your Sitting Space

We’ve always had a table and chairs but somehow adding an umbrella made it all the more inviting. It can also be nice to keep candles and fresh flowers or potted plants on the table for decoration, just to make it all the more cozy. And don’t forget your four legged friends – Lucky decided that this pile of old blankets destined for the bin was the most inviting spot in the garden!

Plant Trees

Trees are a great way to fill an outdoor space with greenery and life, and they also provide shade on warm summer days! If you feel particularly ambitious, plant an orchard.

Make a Play Area

Play time isn’t just for kids. We’ve installed a pull-up bar in our garden  and hope to add on a set of rings in the near future. Check out Incite Fitness for all kinds of fun monkey bars and pull up bars that they’ll install for you (and if you do get one, be sure to use the code SMARTERFITTER for 10% off).

Any more ideas for pimping your outdoor space? We’d love to hear about them! Let us know in the comments! 🙂

Health and Fitness

Help prevent eye problems with these food hacks

February 27, 2017 · By Monica Shaw

This is a guest post from Senior Optometrist Bryony Allen from Leightons, who knows all about what it takes to have healthy eyes. Read on for a fascinating look at how what we eat affects how we see!

Superfoods are all the rage when it comes to tailoring healthy diets that promote weight loss and the like, but one area that isn’t so often talked about is eye care. What foods and meals can you introduce to your diet that not just safeguard your vision but improve it? And do carrots really help you see in the dark?

Egg and citrus breakfast boost

You can get your day off to a great start with some simple ingredients. Depending on how you have them, eggs can be extremely beneficial to your eye health. This doesn’t mean you can pile up on the greasy fried variety though. Boiling or poaching eggs are the healthiest options. Requiring less heat, these methods protect the yolk from extended exposure to high temperatures which limits the production of inflammatory toxins and preserves nutrients. These nutrients include zinc and lutein, both of which act to strengthen the pigment of the macular and reduce the risk of degeneration.

Drinking a glass of freshly squeezed orange or grapefruit juice with your breakfast is the perfect way to stock up on valuable Vitamin C. Citrus fruits are packed full of antioxidants, including Vitamin E, that bolster eye tissue and may even help to prevent the development of cataracts and macular degeneration. It’s better still to eat the fruit fresh. Try adding them to a delicious fruit salad alongside some poached eggs on toast.

Lunchtime leafy greens

Green foods are often the bane of diets, but there can be no denying their superfood status. One of the best things about them though is that they can be easily sneaked into recipes, so those who despise the taste need not worry about them invading a meal. Leafy greens are particularly powerful, with the likes of spinach, collards, and kale containing antioxidants such as lutein and zeaxanthin.

Superleaves are perfect for curries and even sandwiches, where the strong flavours of surrounding meats and sauces will mask their presence. Half a cup of spinach contains roughly 10 milligrams of lutein, which is enough to have a significant impact on the prevention of vision loss when consumed regularly.

Fresh fish and the truth about carrots

Ending your day with these foods is a fantastic way to conclude your eye care menu. We’re sad to report that carrots won’t enable you to develop night vision, but it is true that they are a great source of vision-boosting vitamins. They get their trademark colour and name from a type of Vitamin A called beta-carotene. While all forms of Vitamin A are very beneficial to the health of your eyes, this variant is particularly good for your retina. Carrots can be best enjoyed as part of a tasty lasagne, stew, or stir fry.

Oily fish such as mackerel, salmon, and tuna, are prime sources of omega-3. This fatty acid can strengthen the macula to help prevent macular degeneration in adults. It is also known to help prevent dry eye syndrome. Eating these fish fresh is the best way to consume all of their nutrients. Tuna pasta is a quick, easy, and very healthy way to get your omega-3 fix.


The experts at Leightons can provide tailored treatment and advice for all aspects of eye and ear care. For further information about dietary changes that can benefit eye care and personal recommendations for safeguarding your vision, get in touch to book an appointment today.

Post sponsored by Leightons. 

Smoothies

How to Make a Healthy Breakfast Smoothie

February 7, 2017 · By Monica Shaw

How to make a healthy breakfast smoothie

Breakfast smoothies are super handy for people who don’t have time in the morning for a leisurely sit-down breakfast. This is particularly true for those of us who do high intensity exercise before work, where breakfast nutrition is crucial but time is of the essence. For this very reason I’ve been fine-tuning a breakfast smoothie that takes just a few minutes to make, contains all the best nutrients, and will keep you going until lunchtime without any sugar crashes.

Here are the essentials…

Oats

One of the best slow burning carbohydrates known to man! Oats contain beta-glucans, a type of soluble fibre that slows down the absorption of carbohydrates into the bloodstream. This slower digestion prevents dramatic spikes in blood sugar and insulin levels that would otherwise encourage our bodies to produce and store fat. Yay oats!

How many oats? Add 40-80g depending on your size.

Protein Powder

After a workout your body needs protein to repair damaged muscles, so I like to amp mine up with a bit of high quality whey protein powder. The MaxiNutrition Gen-P Protein Powder is a whey protein blend specifically designed for after high-intensity training.

If you’re after vegan protein powder, I recommend organic hemp protein or organic pea protein.

How much protein powder? Add 20-30 grams, about a scoop of protein powder.

Nuts and Seeds

Nuts and seeds provide slow burning, nutrient-dense fats to help keep you going throughout the day. I almost always add flax seeds plus cashews, pecans, or walnuts. Other options include chia seeds, pumpkin seeds, brazil nuts, hazelnuts… really any nut or seed so pick your favourite!

How many nuts and seeds? And a handful of nuts and a heaped tablespoon of seeds.

Fruit

Go easy on the fruit folks! Too much fruit means lots of sugar and calories that will cause you to crash and burn shortly after you’ve finished your smoothie. Stick to ONE FRUIIT PORTION. For example:

  • 1 large apple
  • 1 small apple + 1/2 banana
  • 1/2 banana + a handful of berries

How much fruit? One portion size of fruit as outlined above.

Liquid

You can just use water but the addition of whole milk or nut milk adds extra nutrients and makes for a richer yummier flavour. Avoid using fruit juices. If you have a cold-press juicer, juiced vegetables such as beetroot, carrots, cucumber, and celery are great in smoothies.

The above ingredients are enough to make a pretty tasty smoothie, but you might also want to add…

How much liquid? Enough to blend to get your desired consistency. I like my smoothies pretty thick, so usually about 100-200ml of liquid depending on how juicy the other ingredients are.

Vegetables

For a delicious green smoothie, add a couple handfuls of spinach or curly kale. But don’t stop there. If you have a power blender, try

  • Beetroot
  • Carrots
  • Cucumber
  • Celery
  • Avocado (makes for a super thick and creamy smoothie!)

How much veg? About a handful of cut up vegetables.

Herbs and Spices

Here are a few of my favourites:

  • Fresh mint
  • Fresh ginger
  • Cinnamon
  • Nutmeg
  • Allspice
  • Nutmeg

How many herbs and spices? A small 1cm piece of fresh ginger, a handful of fresh mint leaves, or a good pinch of spices.

Putting it all together

To summarise, your ultimate healthy breakfast smoothie formula is:

  • 40-80g oats depending on your size
  • 20-30g protein powder
  • a handful of nuts and seeds
  • 1 portion of fruit
  • about 200ml liquid, enough to blend to your desired consistency
  • a handful of veg such a spinach or kale (optional)
  • a handful of herbs such as mint (optional)
  • a pinch of spices like cinnamon or nutmeg (optional)

All that’s really left to do is to put everything in your blender and blitz away!

If you’re after more specifics, check out these top tips and recipes:

  • Green Apple Smoothie with Avocado and Lime
  • Yoghurt and Berry Protein Smoothie
  • Autumn Blackberry and Apple Breakfast Smoothie
  • Favourite Smoothie and Juicing Products
  • My awesome smoothie book 😇

Yoghurt and Berry Protein Smoothie

Any other breakfast smoothie fans out there? What other ingredients do you like to add? What is your ultimate recipe? Please share in the comments!

Travel

Vegan Gourmet at Demuths Cookery School

January 11, 2017 · By Monica Shaw

We recently had the opportunity to attend the Vegan Gourmet course at Demuths Cookery School. No, we’re not vegan, nor do we plan to go vegan anytime soon. Even so, a course like this seemed a great opportunity to expand our vegetable horizons and get some new creative ideas for making interesting, totally plant-based meals. After all, we all know that everyone should be eating lots of vegetables so who wouldn’t benefit from a course like this, be they vegan, vegetarian, or your average omnivore?

A little disclaimer: I’ve been working with Demuths for several years. I also had my own paltry stint at vegetarianism for almost 20 years, so I’m not exactly new to cooking with vegetables, and they continue to form the mainstay of my diet. But it’s easy to get into a rut (for me that rut involves a lot of kale salads!). I’m grateful that Andrew loves vegetables as much as I do though he doesn’t have quite the same experience cooking with them. So a course like Vegan Gourmet offered him the chance to really explore the possibilities of vegetable cookery, and me the chance to learn new techniques with ingredients I already love.

Demuths varies the dishes they make based on season and availability, so the menu isn’t revealed until the day of the class. We were happy to discover it included a few ingredients we particularly enjoy: tempeh, fennel, and shallots!

The class was a mix of demonstration and hands on cookery, including some bonus tips on knife skills and food styling. Everything is very casual, and the tutors are extremely friendly and welcoming. It all ends up being a lot of good fun and great banter with the other students and chefs. We thoroughly enjoyed every minute of it and thought each and every dish was delicious. It’s totally changed the way we make tempeh (thin and crisp!). We make the braised fennel and shallot recipe on an almost weekly basis (recipe below), often to go with fish, which just goes to show how useful a course like this can be in helping you learn to augment your otherwise excessively meaty meals!

But what’s been really amazing are the general skills Andrew has taken away with him. I’ll let him explain…

Vegan cooking for omnivores… and embracing the mise en place

Having been an omnivore for as long as I could remember eating food, I’d had very little exposure to purely plant-based food and cooking until recently. There’s no doubt that all of my assumptions about food and cooking were very meat-centric (although I’ve always loved cooking with fish). But recently, I’d started to experience all of the joy of a newcomer when it came to cooking with ingredients like tempeh and fennel, and my mind was definitely beginning to open up. So, when Monica suggested we try the Demuths Vegan Gourmet course in Bath, it’s fair to say I was a lot more enthusiastic about it than I might have been a few short years ago. I’d started a food journey, and this seemed like a sure-fire way to develop my interest.

By the middle of the morning session, my mind was brimming with new ideas, and I couldn’t wait to start experimenting with them at home. Within an hour, I’d vastly improved my knife skills, and I was finding myself giving so much more thought to why I do certain things in the kitchen. Why do I use this oil with this dish? Why do I use this amount of heat to fry garlic cloves? What do I want the texture of this dish to be like, and how will I achieve what I want? I was starting to think from scratch about my food assumptions.

When Monica and I booked on the course, I wasn’t quite sure what to expect. Being interested in eating food from all kinds of sources other than plants, I wasn’t sure how much of what I would learn I’d find myself applying in our kitchen at home. When I got home, it became almost immediately clear that these new techniques and the new way of thinking was now a part of my repertoire, and it was rejuvenating all sorts of dishes. The course had a profound impact on the way I cook and think about food for one reason more than any other: I’m now so, so much more discerning about ingredients and technique. And, of course, I now can’t cook anything at all without putting all the ingredients in little ramekins first. I just can’t.

Making aquafaba at Demuths Cookery School

Vegan Gourmet is one of Demuths most popular classes but they also run a range of other vegetarian cookery courses that also offer plenty of plant-based inspiration. Visit Demuths’ website for more information about their courses and their impressive collection beautiful vegetarian recipes.

For a sampler, here’s the recipe for that awesome braised fennel and shallot dish I mentioned. Enjoy!


Braised Fennel and Shallots

Recipe courtesy of Demuths Cookery School

Serves 4

Ingredients

  • 2 heads of fennel
  • 2 banana shallots, peeled
  • 1 tsp sunflower oil
  • 1 tsp sugar
  • ¼ tsp salt
  • 3 tbsp olive oil
  • 8 cloves garlic, crushed open and peeled, but left whole.
  • 2 tbsp capers
  • 2 tbsp pitted kalamata olives
  • ½ lemon juice and zest
  • 2 tomatoes, chopped
  • 2 sprigs thyme
  • 100ml vegetable stock


Method

  1. Cut the fennel and shallots into wedges. Rub the sunflower oil, sugar and salt all over them.
  2. Heat a teaspoon of sunflower oil in a large frying pan and fry the fennel and shallot on a high heat until golden. Remove them from the pan and put to one side for later.
  3. Gently heat the olive oil and fry the garlic on a very low heat until starting to soften and colour slightly. Add the capers and fry for a minute, then add the olives, lemon and thyme and chopped tomatoes. Place the fennel and shallots back in the pan, add the stock and place a lid over and cook on a gentle heat for 15 minutes.  Remove the lid and turn up the heat, simmer until the sauce is reduced and coating the fennel.

Tips: As a garnish use a peeler to shave some raw fennel, place in iced water for 30 minutes to curl and crisp up.

Demuths Vegan Gourmet Cookery Course, Bath UK

Main Course

Stuffed Tomatoes for British Tomato Week

May 19, 2016 · By Monica Shaw

Tomates Farcies - French Stuffed Tomatoes

This week is British Tomato Week, timed to coincide with the arrival of fresh British greenhouse tomatoes in the nation’s supermarkets, farm shops, and farmer’s markets. If there’s any food to convince you to “buy local”, then tomatoes are it (just buy a tomato during the winter months if you don’t believe me). So for those of us in Blighty who’ve been forgoing our tomato fixation during the long winter, it’s time to celebrate the return of this marvellous Mediterranean veg and get cooking with tomatoes that have been grown on our home turf.

Where to begin? There are a few staples you could go for: tomato soup, tomato salsa, or even straight up sliced tomatoes with salt, pepper and olive oil. Great British Chefs has a fantastic collection of tomato recipes (you really can’t go wrong with gazpacho).

Heirloom tomatoes for British Tomato Week

For me, the ultimate way to celebrate tomatoes is with this recipe for Tomates Farcies, a stuffed tomato dish that originates from Southern France and which I learned on a cookery holiday with Demuths Cookery School. It’s truly a celebration dish, perfect for serving a crowd. The key is, of course, to use the ripest, tastiest tomatoes you can find. The filling is based on rice, but you can adapt the veggies to suit what you have to hand.

Tomates Farcies (Stuffed Tomatoes)

Recipe courtesy of Demuths Cookery School
These are vegan without the cheese.

  • 200g Camargue red rice (or whatever red rice you have on hand)
  • 250ml white wine
  • 750ml hot vegetable stock
  • A few sprigs of bay, rosemary, thyme and oregano (or a pinch each of dried)
  • 6 ripe but firm large tomatoes
  • 1 onion, finely chopped
  • 1 garlic clove, finely chopped
  • 350g finely chopped vegetables (red pepper, mushrooms, leek, carrot, kale, whatever you have around)
  • 4 tbsps olive oil, plus extra for drizzling
  • Salt and freshly ground black pepper
  • 1 tbsp tomato puree
  • 3 tbsps chopped fresh basil
  • handful of chopped fresh flat leaf parsley
  • 100g Parmesan, or similar cheese, grated (optional)
  • salt & pepper

Method:

  1. Preheat the oven to 200C/390F.
  2. Cook the rice in a medium saucepan with the vegetable stock, the glass of wine and herbs. Stir occasionally and simmer until just cooked through, which takes about 15 minutes for red rice, make sure the rice isn’t over cooked as it is cooked again inside the tomatoes. Drain. Set the rice aside.
  3. Cut a thick slice off the top of each tomato; leaving on the stalk if you can and reserve the tomato tops. Cut and scoop the seeds, pulp, and juice from each tomato into a small saucepan. Simmer the tomato pulp for 15 minutes and then strain through a sieve, reserving the pulp and discarding the seeds.
  4. Oil the bottom of a baking dish, big enough to fit the tomatoes snugly, with 2 tbsps of the olive oil. Place the hollowed tomatoes in the prepared dish.
  5. To make the filling. In a frying pan fry the onion gently in the remainder of the olive oil, until soft and starting to caramelise. Add the garlic and fry for a minute before adding the vegetables with a little salt and pepper. Gently fry for five minutes and then add the strained tomato pup. Cook for a couple of minutes and then add the parsley, some of the cheese and rice (add as much so that the rice to veggie ratio is just as you like – you might have some rice leftover). Combine well. Add the tomato juice to achieve a moist filling. Taste and season well.
  6. Spoon the rice mixture into the hollowed tomatoes, mounding slightly. Sprinkle leftover stuffing on the bottom of the pan. Drizzle entire dish with olive oil and the remaining cheese. Place the reserved tomato slices on top the tomatoes. Bake until the rice is heated through, about 20 minutes.

Travel

The Elderflower Restaurant, New Forest

November 19, 2015 · By Monica Shaw

Good things happen when…

  • You ask to see the chef
  • You go to the New Forest
  • You enthuse
  • You embrace the magic of elderflowers

And so it was. Halloween 2015. Emily and I, elderflower enthusiasts and wearers of capes, happened upon The Elderflower Restaurant in Lymington, following an epic day of mushroom foraging in the New Forest (and a humble pub crawl through this small village). We were already sold on the name, but the atmosphere and the stellar reviews convinced us that we needed to try this place. So we booked in for lunch the next day and experienced a meal that was nothing short of rock & roll.

TheElderflower_Mushrooms

The standout dish was by far the mushrooms served on celariac puree, topped with crispy kale and toasted pine nuts. And while there was some contention about the use of foam on their rhubarb dessert, I maintain that their pudding was the most inventive and delicious execution of rhubarb I’ve ever had, made all the better with fennel-infused Turkish delight.

TheElderflower_Dessert

The food is the work of chef Andrew du Bourg who runs the place with his wife Marjolaine. They are a dream team, and I am particularly grateful to them both for our grand finale: a cocktail lesson featuring their own elderflower cordial, an exchange that wouldn’t have happened were it not for our shared love of this magical perennial plant. (The cocktail later played a role in our Samhain festivities which I may get around to writing about at some point.)

And if all that weren’t enough, The Elderflower has a dessert called “British and French Cheese Journey”. Unfortunately we had a long drive ahead of us and weren’t sure if a full stomach of cheese and wine was really wise for the road. And after all, better to leave wanting more. We’ll be back soon!

The Elderflower Restaurant
4-5 Quay Street
Lymington
Hampshire
SO41 3AS
elderflowerrestaurant.co.uk

Breakfast

Green Apple Smoothie with Avocado & Lime

October 24, 2015 · By Monica Shaw

This is a signature smoothie of mine during autumn months when the orchard is in full swing and kale is in season. It’s easily adaptable to suit other fruits and greens (spinach, chard, etc).

I use a juicer and a blender to make this (see my favourite products for making smoothies) but don’t despair of you don’t have a juicer. Just put all the ingredients in your blender (squeeze in the lime juice and cut the ingredients into small blender-friendly pieces) and add water as needed to blend to a smooth consistency.

Green Apple Smoothie

Serves 1

  • 1 large apple (or pear!)
  • 1 stick celery
  • 1/4 cucumber
  • a big handful of spinach or kale
  • 1/2 lime, peeled (or lemon, rind on)
  • small slice of ginger (optional)
  • 1/4 avocado
  • 1 Tbsp psyllium husk (optional; makes it thicker and adds fiber)
  • 5g flax seeds
  1. Juice the apple, celery, cucumber, spinach, lime and ginger.
  2. Put the juice in your blender along with the avocado, psyllium husk and flax seeds. Blend until smooth, about 20 seconds (if using psyllium husk, I suggest waiting for a minute or two and then blending again, as it takes a few minutes for the psyllium to absorb the liquid).
  3. Serve as desired with your favourite garnishes (I like grated carrot, muesli, goji berries, and lots of spirulina!).

My recommended tools for the job: the Froothie Optimum 600 Slow Juicer and Optimum 9200 Blender. 

Main Course

Chestnut Flour Pasta

March 16, 2015 · By Monica Shaw

Chestnut Flour Pasta

I don’t get to see my sister, Stephanie, very often, maybe once per year if I’m lucky. So when we do get together it almost always involves an extended adventure, usually in the form of a road trip. One year it was New Orleans, another year, the Pacific Coast Highway. In November 2010, the road took us to Italy for a long, mostly leisurely drive from Rome to Bologna over the course of ten days, taking in as much as we could along the way.

Pian di Marte ospitalita rurale

One of our stopping points was Pian di Marte, a farmhouse-style agriturismo in the Umbria countryside where we had one of the best meals of our lives. In fact, it was our first meal outside of Rome and we hadn’t yet gotten used to the whole course-after-course-after-course thing that Italians are known for. That pasta was merely a “first” course was unknown to us (particularly as we’re vegetarians so used to pasta being the main event).

Morning at Pian di Marte

So at Pian di Marte, when we received our pasta course – homemade chestnut pasta with pine nuts, butter, rosemary and cavolo nero – we really went to town. And it was easy going because the dish was incredible. The pasta, made with chestnut flour, was hearty, nutty and unlike any pasta we’d had before. I’m not one for “whole wheat” or “spelt” pastas – they’re usually gritty and fall apart. But this chestnut pasta stood on its own and was a perfect match for the earthy rosemary and kale. Served alongside local cheeses and homemade bread, I don’t deny that we were in carbohydrate heaven, and we almost didn’t mind that we left little room for the three surprise courses to follow. The pasta was the stuff of instant legend.

Really amazing pasta

Thus began a quest to recreate the famous Pian di Marte chestnut pasta, and in the years since Stephanie and I have tried several times to relive the magic in our own kitchens.  After two so-so attempts with “chestnut pasta” recipes found on the internet, Stephanie finally had the bright idea to ask Pian di Marte how they made the pasta on their Facebook page. Turns out, the recipe has been on Pian di Marte’s blog all along, where they called it Tagliatelle con farina di castagne, zucca e salsiccia. (Note to self: if looking for a recipe based on a meal had in a foreign country, search for the recipe in that country’s language!)

Making chestnut pasta

The secret, we found, is in the flour. Look for Italian chestnut flour (farina di castagna) which is finely ground and suitable for pasta making. A pasta maker makes things easy, but you don’t need one – we made this by rolling out the dough with a rolling pin as thin as possible, and then slicing into ribbons with a pizza wheel.

Drying chestnut pasta

The dough is versatile, and makes delicious spinach and ricotta ravioli. But don’t go too crazy – you don’t want to overpower the great flavour of the pasta. Our favourite way with this pasta, in the Pian di Marte style, is to serve it simply with some lightly sautéed garlic and rosemary, a glug of good olive oil and a sprinkle of toasted pine nuts.

Chestnut Pasta

This recipe makes quite a lot of pasta but you can easily dry most of it and keep it on hand for the coming weeks. 

  • 400g chestnut flour
  • 200g whole wheat flour
  • 200g Italian ’00’ flour
  • 6 eggs
  • a pinch of salt

Method:

  1. Combine the flours on a large clean table and form a well in the middle of the flour pile. Break the eggs into the well, add a pinch of salt, mix together with your hands and knead for about 3 minutes, until you get a soft, pliable dough. Cover the dough with a cloth and leave to rest for half an hour.Making chestnut pasta
  2. Chestnut pasta dough
  3. Roll out the pasta dough as thin as you can (using a rolling pin or a pasta maker) then cut into whatever shape you’d like – I like thin ribbons, or squares or rounds for ravioli. If you’re not using a pasta maker, a pizza slicer is a handy tool for this.
    FreshPastaMaking
  4. If you’re not going to cook it straight away, dust the pasta with semolina or flour and drape it over a rack to dry.Drying chestnut pasta
  5. Or cook the pasta immediately in a pot of boiling, salted water until al dente (4-5 minutes).

Also seen on Great British Chefs.

Happiness

Imbolc: A celebration of Spring and sheep milk!

February 7, 2015 · By Monica Shaw

Imbolc Chalkboard

Last weekend marked the halfway point between Winter Solstice and Spring Equinox , a festival called “Imbolc” in the parlance of the “Wheel of the Year”.

Have I lost you already? What is this Wheel?

The Wheel of the Year, in a nutshell, is an annual cycle of seasonal festivals observed by many modern Pagans (Wikipedia). Don’t panic – I’ve not gone all Wiccan on you, despite my fixation with stone circles and wearing capes. In fact, I find the whole God and Goddess aspect of the wheel – and the spells and chants – a little uncomfortable. However there is much to the Wheel that I have latched on to, which comes down to what I always latch on to: science!

WheelOfTheYear-WeAreHere

The Wheel of the Year is based on the actual movement of the sun and how it effects the seasons. Festivals occur on the solstices (longest and shortest days of the year), equinoxes (days when the day and night hours are equal) and the four midpoints in-between.  Why not use this cycle to hallmark our own lives? It seems all the more important in this day and age when, surrounded by all these marvels of technology and modern society, it is easy to become divorced from nature. And yet, the seasons impact everything around us and thus our feelings throughout the year (anyone who gets a bad case of SAD every winter knows this well).

elderbud Elderbud – a small sign of spring! Picture by Emily.

I like the Wheel because it helps me connect with what’s going on in the world around me, and offers structure by giving me “checkpoints”  through which I can track my own projects and my progress towards my goals.

I’ve been following along with the Wheel since Summer Solstice 2013 with my friend Emily (see this post which I like because at the time I wrote it, I don’t think we realised that we’d become total Wheel converts, but the “buds” of the Wheel are there!).

Back to Imbolc.

Imbolc celebrates the first, barely discernible, beginnings of spring, the first stirring of buds and the gradual lengthening of days. It is the glimmer of hope for brighter days ahead! It’s a time to clear out old habits (hello spring cleaning) and get ready for the new season. It’s time to set into motion – slowly – all of those projects and intentions we set ourself over winter.

#Imbolc miracle: these bad boys bloomed over the weekend, symbolically calling me to action. Time for my own projects to stir out of their winter slumber!

The etymology of the word “Imbolc” is a little unclear, but most scholarly people agree it has something to do with ewe’s milk, thus making sheepy things a common symbol of this festival. What a great excuse to discover alternative dairy products to the usual moo cow!

I celebrated Imbolc last weekend with Emily and a few other good friends. Going into the weekend, I wasn’t sure what Imbolc “meant to me”, aside from a good excuse to practice a new seasonal cocktail (at some point I’ll reveal the “Prosecco Plus”), eat sheep cheese, create awesome kale salads with sheep yogurt dressing, and make marmalade. But by the end of the weekend, with the help of my friends, I think I’ve worked out a few things (not the least of which were a few new cocktail recipes)…

#masteroftaste

Last winter I picked four big projects that I would focus on this year, loosely termed Outdoor Adventure, Smarter Fitter, Financial Freedom and Fittest Self Ever. I’m an impatient person, so coming around to Imbolc I felt a little ho-hum about my progress with any of these items (except for perhaps the Ridgeway). (This was paired with an ongoing distraction I’ve felt ever since the holidays due to both workload and “figuring life shit out” type stuff.)

Imbolc was a reminder that winter is not the time to go all gung ho on productivity and personal development. I liked Rachel Demuth’s post on winter comfort food which sums this up in the context of “detoxing:

“It always baffles me that January is considered the month for “detoxing” or eating lightly. Yes, many of us probably indulged a bit over the holiday season, but this definitely isn’t the time for a supper of six raisins and lettuce leaf!”.

Winter is a time for hunkering, hibernating and nourishing the body so that we’re ready to take on the world when the sun and Spring finally come around.

Marmalade hijinks at @rachel_demuth's. @grumblybean rocking the ginger.

But now the days are getting longer and new buds are just starting to appear on the trees and in the hedgerows. Imbolc, for me, means it’s time to wake up from winter hibernation and start making steps to setting my own projects into motion. Again, the dark days of winter are still very much in evidence, so let’s not rush anything. But let’s bust out the broom and get things ready to rock this spring.

My Imbolc to Equinox plans include

  • Spring cleaning – I want to declutter the things you can’t see (closets, cabinets, drawers)
  • I have hired a nutritionist to help me get my diet sorted for Fittest Year Ever – more on that later
  • I have already taken steps on the Ridgeway which I’d love to complete in the next few months. I also need to set dates for Pembrokshire and France Cycle Touring this summer.
  • I have a list of things I want to write about on SmarterFitter that I will now turn into an actually “content” plan with dates and deadlines.
  • I’ve put a date in the calendar for budget day, which fills me with dread but it has to be done. I want a solid savings plan in place by Equinox (March 20). Financial Freedom or Bust.
  • Another cringer: I need to redo my website monicashaw.com to reflect my new business focus on web analytics (i.e. Financial Freedom). This is totally outsourcable, and I’ve even found someone to do it, but I still need to manage the project – can I outsource that, too?
  • Getting to the bottom of gelatization
  • The Weekly Wheel!

The Weekly Wheel
 
Another thing to come out of Imbolc is a project that’s been stewing for a while: The Weekly Wheel is a secular website and newsletter that’s all about how to use the cycle of the seasons to hallmark your own life. Subscribe now!

Stay tuned for some further reflections on Imbolc discoveries, including breakfast martinis, smoothie bowls, Old Bay salad dressing and chia pudding. 

Breakfast of #Imbolc champions. Chia pudding smoothie bowls. All of the garnishes. And tea. #froothie #jumpstart15

Related links:

  • Weekly Wheel Newsletter
  • Game Changing Kale Salad
  • Solstice and Elderflowers
  • Spring Equinox Revelations
  • Making Marmalade, Making Friends [demuths.co.uk]

Recipe

Things I’m Making With This Ginormous Pumpkin

January 17, 2015 · By Monica Shaw

Why I do #crossfit: so I can tame beasts like the Crown Prince! Which I happen to have thanks to a generous green thumb at @crossfitcirencester.

This pumpkin was gratefully received from one of my fellow Crossfitters, and it’s quite a beast! Especially for one person. But it’s a high-quality challenge, and I’m ready to take it on. Fortunately pumpkin keeps very well so there’s no huge rush and I have plenty of time to try lots of different recipes. Here are a few of my plans but further suggestions are most welcome.

  • Pumpkin Soup – Good, simple, reliable; something to add to the freezer soup stash for easy weekday lunches. I’ll either go for the classic curried pumpkin soup, though I spotted this squash soup seasoned with mixed spice on Kavey’s blog that sounds happy, like pumpkin pie in soup form (I’ll sub the bacon brittle for toasted pumpkin seeds)
  • Pumpkin Hummus – Inspired by Kellie’s Roasted Pumpkin Hummus. I have made this once already and I’m not certain the pumpkiny-sweet hummus is for me. It definitely requires balancing with lots of toasted pumpkin seeds and a potent garnish (berbere, smoked paprika, piment d’Espelette or similar). My favorite dipping implement for this is broccoli or straight up raw kale.
  • Pumpkin Laksa – Adapting Demuths recipe for Laksa Lemak from Rachel Demuth’s Green World Cookbook.
  • Pumpkin Curry – Another gem from Rachel Demuth. A bit unusual with the orange juice, but all the better for it.
  • Roast Pumpkin and Walnut Salad – Yes it’s another Rachel Demuth recipe. What can I say? She rocks the veg! I think I’ll roast the walnuts with a bit of chilli.
  • Veggie Chilli – Either a winter riff on Mardi’s seasonal Summer Veg Chilli, or a twist on Abbey’s Sweet Potato and Black Bean Chilli (using pumpkin in place of sweet potato).
  • Sambar with Pumpkin – From Jenny Chandler’s excellent book Pulse: Truly Modern Recipes for Beans, Chickpeas and Lentils, to Tempt Meat Eaters and Vegetarians Alike
  • Pumpkin Bread? I’m not really doing the wheat thing at the moment but Laura’s Savory Pumpkin Loaf is pretty tempting, and could be particularly fitting for imminent Imbolc celebrations and its associated sheep cheese consumption.
  • Pumpkin Smoothie? I have a pumpkin pie smoothie in my book, but Helen’s Pumpkin and Cranberry smoothie looks like a lot of fun, too.
  • Frittatas. Lots of frittatas. With kale.

Spiced Pumpkin Soup

Roasted pumpkin salad with walnuts and Homewood Cheeses' pickled ewes cheese

Pumpkin Curry

Older Posts
  • Facebook
  • Instagram
  • Pinterest
  • Twitter

Search


Instagram

Instagram has returned invalid data.

Follow Me!

About

  • About
  • Work with Monica
  • Contact
  • Smarter Fitter Smoothies

Follow Me

  • Facebook
  • Flickr
  • Instagram
  • Pinterest
  • Twitter

Search

Subscribe

Buy my book

Smoothie eBook

Copyright 2022 smarterfitter